WaveEdit
Bjarke Laustsen, Brian Pedersen, Gabriel Siegel and Martin Jřrgensen

WaveEdit is a graphical wave sequencer and editor. Our goal has been to create a useful application with a polished look and feel. We wanted a program that people would actually be able to use - even though they were not computer scientist. WaveEdit is a 4-track wave sequencer where the user can load clips from audiofiles, move them around in time, play them simultaneously by placing them in different tracks, apply various filters and finally render the result back to a new wave file. Our goal has also been to familiarize ourselves with the mathematics behind filters, and try to implement these from scratch. Thus, we have not used any pre-written Fourier transforms or the such, but have written all of our code completely from scratch.
This webpage is organized as follows: First we will describe our program from the users point of view. We will introduce the program features and talk about how to use our program. Second we will describe our program from a computer scientists point of view . We will describe how our code is organized and how the program has been implemented in Java. We conclude with some remarks about our experience with creating audio applications in Java, as well as some notes about future work.
WaveEdit can be obtained using three different methods, which all will be described below. Please note that the instructions on how to run WaveEdit are for Windows powered computers, and there may be slight variations if using Linux/Mac.
WaveEdit can be obtained by downloading WaveEdit.jar.
Starting the program is a matter of doubleclicking the jar file, or executing the following command from a shell/prompt
java -jar WaveEdit.jar -Xms256m -Xmx512m
Please note that when executing the jar file via doubleclicking, it is recommended to increase the memory available for java. This is taken care of when using the above mentioned command.
Pre-compiled Java class files can be downloaded here.
Start a shell/prompt, and change directory to the downloaded and unziped class files. Execute the following command:
java -Xms256m -Xmx512x -classpath . WaveEdit
The full source code for WaveEdit can be downloaded here.
Unzip the file to a directory, and compile the source with the command:
javac *.java
The code is then executed using the command described in the previous section.
The SequenceView is the main window of the application. Here the waveforms are displayed at their proper locations in the proper tracks.
The user may zoom in on and scroll this view, so he sees exactly the area of interest.
The toolpalette provides the user with the core functionality of the program. Six such tools allows the user to perform the most commonly needed tasks such as moving, selecting and zooming. Shortcuts makes it more convenient to switch between tools. The active tool is always shown encompassed by a red rectangle.
Below the toolpalette are a few auxiliary buttons. One for deselecting everything, a palette for switching between the four tracks (and
for muting any track) and finally buttons for scrolling and zooming. Below the SequenceView are the playback related buttons for stopping/playing
and for rewinding.
The menus provide access to the rest of the program's suite of functions. The file menu contains functions for managing projects, for rendering to a wave file and for exiting the application. The edit menu provides functions for simple editing of wave files such as amplification, copying, cutting and pasting. The application has a full-fledged clipboard where several clips may be stored at a time. The insert menu provides functionality for importing wavefiles and inserting sine waves, pulse waves, sawtooth waves or noise clips (which all may be useful when playing around with filters etc.). The effects menu contains the suite of available audio filters that the program supports. The view menu provides a function for viewing the details of a single wave clip, the current project, and for showing information about WaveEdit.
The first thing one wants to do is to get some wave sound into the application for editing. This can be achieved from the Insert menu. Here one can either insert an exiting wave clip or have WaveEdit generate a wave clip with a certain standard waveform (sine, sawtooth etc).
To insert a wave clip in the active track at the cursorposition choose Insert > Wave File (CTRL-O).
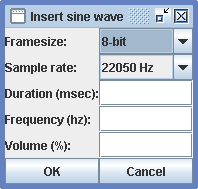
To insert a sine wave in the active track at the cursorposition choose Insert > Sine Wave. A dialog appears that will allow the user to input the duration of the clip, the framesize, the sample rate and the frequency of the sine wave. Finally the user may enter the volume. A volume of 100% will make a signal using the full [-1;1] range, where a volume of 50% will use half this range ([-0.5;0.5]). The figure below shows the sine wave dialog.
WaveEdit also supports sawtooth waves, pulse waves and noise. These have parameters similar to the ones for the sine wave. The pulse wave dialog has an additional field for specifying the pulse width. A pulse width of 50% will give a balanced pulse (0 and 1 half the time). Increasing the pulse width to 75% will create a pulse that is 1 75% of the time and so on.
SequenceViewThe SequenceView may be scrolled left and right by using  and
and  respectively. It may be zoomed in and out of by using the
  and
and  buttons.
The current position (where clips will be inserted and where playback will start) is shown by the long vertical cursor line. The cursor may
be repositioned by clicking in the gray area just above the
buttons.
The current position (where clips will be inserted and where playback will start) is shown by the long vertical cursor line. The cursor may
be repositioned by clicking in the gray area just above the SequenceView (see figure below).

The cursor will then move to the position clicked on. Notice that
this only works, when clicking above the SequenceView. Clicks inside the SequenceView are instead interpreted as an action connected
to the currently active tool. Above the SequenceView are a number of timestamps that show the time axis of the currently visible portion
of the sequence.
The toolpalette contains six tools:
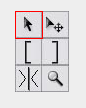
Select Tool: The select tool can be used to select entire wave clips. Simply click on a wave clip to select it. By holding the SHIFT key, WaveEdit goes into multiselect-mode that allows selection of more than one wave clip at the time. Thus, to select two clips simply hold the SHIFT key and then click on each of the two clips in turn.
Move Tool: Selected clips may be moved using the move tool. Simply drag in the SequenceView to move the clips around. By
dragging in the vertical direction, clips may be moved from one track to another.
Left Marker Tool: The left and right marker tools are used to select a region of the active track. The region can span any time
interval, and thus it is possible to select part of a clip, or even several clips fully or partially. Both the left marker and right marker
must be set before any selection is performed. The right marker can only be placed right of the left marker. The left marker tool is used to place
the left marker. Simply click in the SequenceView where you want the left marker to be placed. Please also read the notes below.
Right Marker Tool: (Please see the description of the left marker tool). Places the right marker tool. Is used in the same manner as the left marker tool.
Split Tool: The split tool is used to split a waveclip into two smaller clips. This is useful if you have a wave recording of, say, two distinct sounds with a small pause in between. If you want the two sounds to be played simultaneously, you may use the split tool to split the clip at the pause between the two sounds. Then you may move one of the clips to another track, below the first one. Now, the two sounds may play at the same time. To split a clip, simply click on it with the split tool. This will split the waveclip at the position of the click. Now the waveclip will be split in two separately selectable wave clips.
Zoom Tool: Although zooming may be performed using the and , using the zoom tool is often more convenient. The zoom tool is used to zoom
in on a particular spot. To use it, simply click in the SequenceView where you want to zoom. The zoom tool will then zoom in on the SequenceView, centered
around the spot of the click. The zoom tool can both be used for zooming in and out. The cursor will tell you which mode you are in (zoom in or zoom out mode).
A small plus in the zoom cursor icon indicates that you are in the zoom in mode. A small minus indicates zoom out mode. To change the mode to zoom out hold the
SHIFT key. Clicking with the SHIFT key pressed will thus zoom out.
Note: Deselecting. To get rid of a selection with left and right markers, simply click the Deselect button below the tool palette or use the shortcut CTRL-D. This will also deselect any selected wave clips. This is the only way to remove the left and right markers.
Note: Selection Precedence. Selections made with the left and right marker tools take precedence over selection on per-clip basis. Thus, if a clip is selected and the left and right markers are also set, then the clip selection is not in effect (meaning filter etc. will not apply to it, unless of course, the clip is also between the left and right marker).
For convenience each tool has a keyboard shortcut:
| Tool | Keyboard shortcut |
| Select Tool | S |
| Move Tool | V |
| Left Marker Tool | L |
| Right Marker Tool | R |
| Split Tool | P |
| Zoom Tool | Z |
WaveClips have names. When a clip is inserted it is given a default name. Clips coming from wave files get their filename as default name (minus the extension). Sine waves get the default name "sine wave", sawtooth waves get the default name "sawtooth wave" etc. You may change the name of a clip at any time by selecting it and using the menu Edit > Rename clip. The name of a WaveClip is showed in the lower right corner of the clip (note: if there is not room for the name in the corner it will not be shown - zoom in to enlarge the clip and give more space for the name).
To view details of a WaveClip (such as duration, name, framesize etc.) select it and press i or go to View > Wave Clip Info.
The track palette provides a mechanism for changing the active track. The active track is the track into which waveclips will be placed. The active track is
highlighted by a white background in the SequenceView, and with a blue color in the track selection palette. To change the active track, simply click on one of
the four tracks in the track-palette.
Each track may be muted if you need it. To the right of each track in the trackpalette is a speaker icon. Clicking on this icon toggles between muting and not muting a track. When a track is muted it's speaker icon is displayed with a red cross over it. Please note that if a track is muted during playback, the playback must be stoped and started to achieve muting of the track.
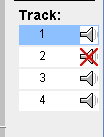
Use CTRL-1 to CTRL-4 as a shortcut for selecting track 1-4.
Playback starts at the position of the vertical cursor line. To start or stop playback you may use the play button  below the
 SequenceView. Alternatively you can
press the SPACE bar to start and stop playback.
To 'rewind' - that is reposition the cursor line at 0 seconds, press the rewind button next to the play button.
WaveEdit has functions for cutting, copying and pasting wave clips. Their use is intuitive and the functions may be found in the Edit menu. They also have the usual Windows shortcuts of CTRL-X, CTRL-C and CTRL-V respectively. There is full support for selections made with the left and right markertool. Thus, subsets of a clip may be cut or copied as well - not just entire waveclips.
WaveEdit has strong support for amplification of audio. The amplify dialog is a rather sophisticated affair:
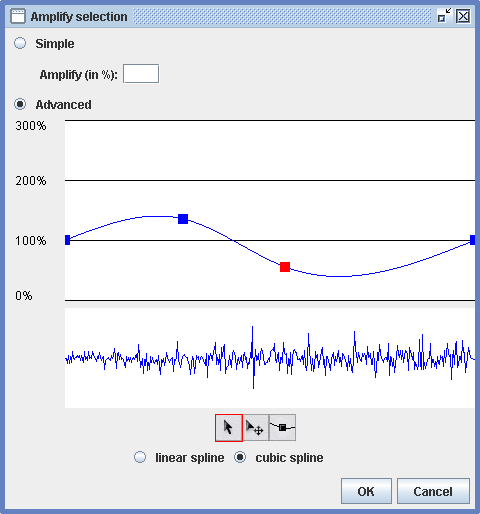
The wave view shows the region that will be affected by the amplification. Now, there are two primary modes of operation: simple and advanced. Radiobuttons are used to switch between the two modes.
In the simple mode, the user may enter a percentage. 0% will kill all audio, 100% will leave the audio unchanged, 200% will double the amplitudes of the audio and so on.
The advanced mode is much more sophisticated. It consists of several parts. A graph view, a tool palette and buttons for interpolation
selection.
In the advanced mode, the user may construct a graph representing the way the audio should be amplified. This allows us to
achieve effects such as Attack-Decay-Sustain-Release or to fade in or fade out parts of the audio. The graph is built on a number of graph points
that are shown as rectangles. Points are connected by lines or curves. By default only two points exists - one at the beginning and one at the end
of the region to be amplified. These points may be moved, but not deleted. Three tools are used to alter the graph: A select tool  , for selecting
graph points, a move tool for moving graph points
, for selecting
graph points, a move tool for moving graph points  and finally a tool for creating new graph points
  . Their use should be intuitive. Click on a graph
point with the select tool to select it (it will appear red), then use the move tool to drag the point to the desired location. If more graph points
are required use the insert graph point tool and click where you want the extra point. The graph will automatically be updated to go through the new
point. Deleting an inserted graphpoint is achieved by selecting it using the select tool, and hitting the delete button on the keyboard, but recall that the two endpoints cannot be deleted. Two interpolation schemes between points are possible: linear or cubic spline. Radiobuttons are used to change the current interpolation scheme. Once the graph is as you desire, simply press the OK button to have the affected region amplified by the amplification graph you have just constructed.
. Their use should be intuitive. Click on a graph
point with the select tool to select it (it will appear red), then use the move tool to drag the point to the desired location. If more graph points
are required use the insert graph point tool and click where you want the extra point. The graph will automatically be updated to go through the new
point. Deleting an inserted graphpoint is achieved by selecting it using the select tool, and hitting the delete button on the keyboard, but recall that the two endpoints cannot be deleted. Two interpolation schemes between points are possible: linear or cubic spline. Radiobuttons are used to change the current interpolation scheme. Once the graph is as you desire, simply press the OK button to have the affected region amplified by the amplification graph you have just constructed.
WaveEdit supports two categories of filters, namely simple and advanced filters, which are located in the menu Effects > Simple filters and Effects > Advanced filters respectively. These filters can be applied to whole clips or a selection. The filters in the advanced filter menu, are filters based on the Fourier transformation, while the simple filters use relatively straightforward number crunching on the input/output samples. When the user chooses a filter from the simple filter menu, a minimal dialog box is presented for entering the different parameters. The parameters for all simple filters are alike, with the exception of the Chebychev filter. For each of the other filters, the user must enter a "low" and a "high" frequency, which will be used to compute the center frequency (the squareroot of low * high). If the user has selected the low shelf, high shelf or peaking band filter, another parameter must be entered. The additional parameter is the gain, measured in dB's.
Using the Chebychev filter requires different parameters than the others, but is otherwise similar to the rest of the simple filters. The cut-off frequency, if it is a low- or a highpass filter, the ripple percent and the number of poles must be entered in the fields of the dialog box. The different constraints on the values are displayed beside the input field to assist the user in entering the correct values.
The first filter in the advanced filters menu, is a filter which doesn’t change over time, but gives you much freedom in selecting which frequencies you want lowered or boosted. After having selected one or more wave clips, it can be accessed through Effects > Advanced Filters > Fourier Transformation Filter.

The graph in the middle of the window is where you control the filter. The graph shows amplitude up the y-axis and frequency out the x-axis. It lets you control which frequencies you wish to have lowered (or completely filtered out) and which you wish to have boosted. The graphic nature of the filter makes it easy to draw curves or notches for changing the amplitude of specific frequencies. The graph controls are as in the amplify selection dialog.
In the top of the window, there are preset buttons for four common filter types, so that these don’t have to be drawn by hand. For example, when clicking the "Lowpass" button, you are prompted for a cutoff frequency. After having entered the cutoff frequency, the graph will now be updated accordingly. As can be seen, it’s a very sharp cut off - if a softer filter is wanted, the graph can be altered manually.
In the lower part of the window, the windowing options for the Fourier transformation can be set. These will be described in more detail below.
Some interesting instruments can be made from the basic waveforms and the noise waveform, just by applying a filter to it. For example, if you try a very narrow bandpass on a noise wave, you can get a vibrating pan-like tone. For example, try a bandpass starting at 800Hz with a width of 50Hz. Since a noise wave should contain all frequencies (although not constantly), you should be able to make any note you like this way. By increasing the width, you can get some ambient sounds that, with a bit of good will, can resemble for example rainforest ambience, bird singing or wind.
The second filter in the advanced filter menu, is a filter that varies over time. This effect allows you to change the cutoff frequency of either a lowpass filter or a highpass filter as a function of time. The two radio buttons at the top of the window, are used to select which filter to use.

The graph now has cutoff frequency up the y-axis and time out the x-axis. The graph is used to select how the cutoff frequency of the selected filter should vary over time. The controls are as before.
Time stretch allows you to stretch or compress a sound while still perserving its pitch. To use time stretch, go to the menu Effects > Time stretch.

In the interface, you can select stretch percent (less than 100% will compress the sound, greater than 100% will stretch it). The harmonic, non-harmonic and robotic radio buttons lets you select which phase correction methods will be used. They will be described in greater detail later.
WaveEdit operates with the notion of a project. When WaveEdit starts an empty project is created. As you add clips, move them around and apply transformations
on them, you may want to save your result so that you may continue your work later. Use File > Save project for this. WaveEdit project files have the
special extension .wep which we have chosen to make project files easily distinguishable from other types of files in your file system. When the
project is saved, all wave clips are stored in the project file, at their correct locations for later retrieval. Use File > Open project to open a
previously saved project. You may also save a copy of your project using the File > Save project as... function.
WaveEdit will in general warn you if you are attempting to exit the application or create a new project, while you have unsaved changes to your current project. The title bar displays the name of the current project. A '*' symbol after the name means that there are currently unsaved changes to your project.
To get statistics for the currently open project choose View > Project Info.
To render a part of the project or the whole project to a wave file, use File > Render to File. Choose where you want your file and press Save. At this point you must choose the format of the resulting wavefile, and also specify whether you want to render the entire project to the file, or just some time interval. Please note that this function assumes that all loaded files and sine waves have a framesize of 8 or 16-bit and also have a samplerate of 11025 Hz, 22050 Hz or 44100 Hz. Other sample rates are not currently supported in WaveEdit.
In this section we will describe the internal workings of the program - thus we will no longer be looking at WaveEdit from the user's point of view, but rather from the point of view of a computer scientist, who knows about digital audio. WaveEdit is a rather large program - much more complex than GOFsynthPro, which we made for our first project. We have written over 40 different classes for WaveEdit and have a code base of over 350 KB. Before we step into the gory details we first provide a class overview, showing the different classes with a short description of their tasks. This should provide a good overview and a nice starting point before we dive into the details of the implementation. The classes are roughly ordered so that the more essential "core" classes are mentioned first, whereas the ones performing more specialized tasks are mentioned last.
| Class name | Short description |
WaveEdit | This is the applications entry point. Contains code for setting up the menu system. |
GUIPanel | The main GUI class. Contains a number of methods for forwarding messages to the wavemanager. Contains code for changing the cursor, and for the key mappings (shortcuts). |
SequenceView | The class representing the sequence view. Contains functionality for scrolling and zooming, and for updating the sequence view. |
WaveManager | This is a manager class that keeps track of all the waveclips in the application. It is here that code for cut, copy, paste may be found. It also has methods for adding a waveclip or deleting one. |
WaveClip | One might consider this class the most important one in the entire program. An instance of this class represents a single wave clip in the application.
There are many methods for creating and updating such wave clips. Furthermore the code responsible for drawing the wave clip in the SequenceView (or alternatively, in one
of the dialogs) may be found here. |
SimpleDialog | This class is used to display a gereric dialog box, consisting of a number of text-input fields, to get input from the user. |
IODialogs | Contains code handling and showing I/O related dialogs (such as the ones for saving and opening a project and for rendering to a file). |
TransformationDialogs | Contains code handling and showing dialogs related to audio transformation (filters, amplification etc.) |
ToolPalette | The ToolPalette class is responsible for drawing the tool palette as well as the other graphical buttons in the GUI (such as the play button, the track palette and so on). It keeps track of the currently active tool. When the user clicks with the mouse, the click is propagated from the GUIPanel, which registers the event, on to the ToolPalette and then further on to the active tool, which knows which action to perform. |
Tool | This is an abstract class representing the notion of a tool. |
SelectTool | Inherits from Tool. Represents the select tool. Communicates with the WaveManager to determine if a clip was selected when a mouse click occurs. |
MoveTool | Inherits from Tool. Represents the move tool. Communicates with the WaveManager to move clips around when the user drags the mouse. |
MarkerTool | Inherits from Tool. Represents both the left marker tool and the right marker tool. Communicates with the SequenceView to update the position of the markers. |
SplitTool | Inherits from Tool. Represents the split tool. Communicates with the WaveManager to split a clip in two, when the user clicks the mouse. |
ZoomTool | Inherits from Tool. Represents the zoom tool. Communicates with the SequenceView to zoom in and out. |
PlaybackThread | Implements a wave-sequencer that is able to handle playback of all four tracks simultaneously. It schedules wave files for playback at the correct times. Playback is performed in a separate thread so the application remains responsive during playback. |
CursorUpdateThread | A thread responsible for updating the vertical cursor line during playback. This needs to be done simultaneously with playback so it takes place in a separate thread. |
AmplifyGraphPanel | Contains code for the advanced part of the amplify dialog - that is code handling the updating and drawing of the amplification graph. |
FourierGraphPanel | Contains code for handling and updating the filter response graph. |
FourierTransform | Contains code implementing the Fourier Transformation. |
SplineInterpolation | Abstract class representing an interpolation method for the graphs for the AmplifyGraphPanel, the FourierGraphPanel and the DynamicGraphPanel. |
CubicSplineInterpolation | Inherits from SplineInterpolation. Implements cubic spline interpolation used for the construction of the graphs for the AmplifyGraphPanel, the FourierGraphPanel and the DynamicGraphPanel. |
LinearSplineInterpolation | Inherits from SplineInterpolation. Implements linear spline interpolation used for the construction of the graphs for the AmplifyGraphPanel, the FourierGraphPanel and the DynamicGraphPanel. |
Complex | An instance of this class represents a complex number - used for the filters. |
Window | An abstract class which is the super class of all windowing functions used with the fourier transformation. |
BlackmanWindow | The Blackman windowing function. |
HanningWindow | The Hanning (or Hann) windowing function. |
RectangularWindow | The Rectangular windowing function, which is constant 1. Using this window, corresponds to not applying a windowing function at all. |
FourierFilter | Contains the code that applies the Fourier Filter effect to a waveclip. |
DynamicFourierFilter | Contains the code that applies the Dynamic Fourier Filter effect to a waveclip. |
TimeStretch | Contains the code that applies the Time Stretch effect to a waveclip. |
SimpleFilter | An abstract class, which sets up the coefficients common to all but the Chebychev filter. The class defines methods calcCoefficient and applyFilter that each simple filter overloads. |
ChebychevFilter | The class implementing the Chebychev filter. The Chebychev filter has two options, either a lowpass or a highpass filter. It calculates the coefficients and overloads the applyFilter method. |
HighpassFilter | Implements a highpass filter using the methods defined in SimpleFilter. It calculates the coefficients needed for the biquad transfer function in the method calcCoefficients. This procedure is common for the following six filters. |
LowpassFilter | Implements a lowpass filter using the methods defined in SimpleFilter. |
BandpassFilter | Implements a bandpass filter using the methods defined in SimpleFilter. |
HighShelfFilter | Implements a high shelf filter using the methods defined in SimpleFilter. |
LowShelfFilter | Implements a low shelf filter using the methods defined in SimpleFilter. |
PeakingEQ | Implements a peaking band filter using the methods defined in SimpleFilter. |
NotchFilter | Implements a notch filter using the methods defined in SimpleFilter. |
LoadScreen | A splash window for showing information such as "Please wait while processing audio...". Used for tasks that take a long time, so the user knows that the program is working, and has not crashed. |
| ProgressScreen | A class to display a progress screen while WaveEdit is processing an effect. |
| SplashScreen | A class that can display and update the splash screen shown at startup. |
In this section we will go into detail with how the program was implemented, which choices we have made along the way, and which problems we needed to solve in order
to create WaveEdit. The section will be structured so that each class is described separately - although there will of course be references to how each class
cooperates with the other classes to perform its tasks. Classes related to Fourier transformation have their own section later on, since they require some amount of
theoretical background preceding the implementation. We begin at the heart of the application - describing the WaveClip class.
This class is key in the implementation of WaveEdit. A WaveClip is a continuous piece of wave audio that may be rendered to the sequence view, played, stopped,
moved about and altered by filters etc.
A WaveClip has a number of central instance variables. It has a starttime and an endtime (useful for other classes that may need to know the time span of the clip).
Times are given as seconds from the beginning of the entire sequence and are thus stored in doubles to allow for fractions of a second to be represented. It also
has an array of bytes representing the raw audio data, held in signed PCM, big-endian format. All audio is converted to this format at load time if it were not in
that form on disk. For filters, we need a double representation of the audio and not just a byte representation. Thus, the class also has a variable storing the
audio data as doubles. However, in reality it is not necessary to keep the (huge!) double array in memory all the time. Therefore we take care only to generate this
double representation when it is needed (that is before a filter is applied to the clip) and then destroy the double array after we are finished with it. This is
crucial in order to achieve an acceptable memory footprint as a 7 MB 16-bit wave file produces a 28 MB double array. The clip also stores information about its own
audio format, such as the frame size and the sample rate. Finally, it has an instance of the Clip class, which is used for the actual playback of audio on the
speakers. Other rather important variables include a boolean stating whether or not the clip is selected, and one stating whether or not the clip is playing right now.
The constructor takes as arguments a byte array containing the audio data, an AudioFormat object describing the format of the audio, a track number and
a starting position in seconds. The last argument is used for knowing when to play the clip compared to other clips, and also to know where to draw the waveform
in the sequence view. The constructor extracts the required information from the AudioFormat object, computes the endtime from the samplerate, framesize, starttime
and the number of samples in the byte array and finally loads the audio data into a Clip.
Central to the WaveClip are the methods for converting between double and byte representation of the audio. Recall that the double representation is required to
apply filters to the clip. The methods for performing the conversions are called packdata
(for converting from double to byte representation - i.e. a packing of data into a smaller container) and
unpackdata (for converting from byte to double representation - i.e. an unpacking of data to a larger container). The source code of these two
functions are given below since it is not completely trivial and highly crucial.
We begin by discussing the method packdata. First the byte array is allocated if it has not
already been done. The size of the byte array must be equal to the number of samples (the size of the double
array) times the size of a single sample (the frame size). Now we loop through each double-valued sample and
convert it to its corresponding byte representation. The first step is to convert the double to an integer.
The double representation is in the interval [-100;100] whereas the 8-bit audio representation is in the [-128; 127]
range and 16-bit audio in the [-32768; 32767] range. Thus we must map the interval [-100;100] into either
[-128; 127] or [-32768; 32767]. This is done by first computing the sample range (256 for 8-bit and 65536 for
16-bit audio). Notice that this is actually equal to 2 raised to the power of 8 times the framesize in bytes.
This number may be computed conveniently using a left shift operation. Now to convert from double to integer, we just
multiply each sample by the target range and divide by the source range (which in our case is 200). It remains
to pack this integer into one or two bytes. If we are using only 8-bit audio, then converting to
a byte value is simply a matter of casting the int into a byte. If we are using 16-bit audio we need to split up
the integer into its two byte components. This is done by a right shift and casts to byte. Finally we delete
the double array. Since Java is a garbage collected language we cannot delete it explicitly, but we can make the
pointer point to something else and wait for garbage collection. So we just make it point to an empty double
array. The code for packdata is shown below, and should be clear from the above discussion:
/* Convert from double values to byte samples. Deletes the data array*/
private void packdata() {
	//If array is not allocated then allocate it first
	if(packeddata == null || packeddata.length / framesize != data.length)
		packeddata = new byte[data.length * framesize];

	for(int i = 0; i < data.length; i++) {
		int isample;

		int samplerange = 1 << (8*framesize);
		isample = (int)(data[i] * (samplerange / (MAX_DOUBLE_SIGNAL_VALUE - MIN_DOUBLE_SIGNAL_VALUE)));

		if(framesize == 1) {
			packeddata[i]   = (byte)(isample);
		}
		if(framesize == 2) {
			packeddata[i*2]   = (byte)(isample >> 8);
			packeddata[i*2+1] = (byte)(isample);
		}
	}

	//Free memory
	data = new double[0];
}
Next we discuss unpackdata which performs the reverse operation. Most of the code is analogous to
packdata although "upside down". However converting from 16-bit samples to a double is not trivial.
In this case we first extract the high-byte into an int and shift it by 8 positions. Now it is NOT sufficient to
simply add the next sample to this integer to reproduce the integer value of the two bytes. This is because the
data is stored signed. Instead we need to AND the sample with a mask (0xFF) and then OR this onto the
low 8-bits of the integer. This gives the desired result.
/* Convert from byte samples to double values. */
private void unpackdata() {
	//If array is not allocated, then allocate it first
	if(data == null || data.length != packeddata.length / framesize)
		data = new double[packeddata.length / framesize];

	for(int i = 0; i < data.length; i++) {
		int isample = 0;
		if(framesize == 1) {
			isample = packeddata[i];
		}
		if(framesize == 2) {
			isample = packeddata[i*2];
			isample <<= 8;
			isample |= (packeddata[i*2+1] & 0xFF);
		}

		double sample;
		int samplerange = 1 << (8*framesize);
		sample = (double)(isample * ((MAX_DOUBLE_SIGNAL_VALUE - MIN_DOUBLE_SIGNAL_VALUE) / samplerange));

		data[i] = sample;
	}
}
Related to these two functions is fetchsample that, given a sample number, retrieves the integer representation of the value of that sample.
The code required for this is just a subset of the code required for packdata, and will not be listed here.
WaveClip provides two methods for cloning a WaveClip. One for cloning the entire clip (clone, and one for cloning only a region of the clip
clonePartial).The latter is useful for the copy-feature. If the user selects a subset of a clip with the left and right marker tool,
and the chooses Edit > Copy, then the entire clip should not be copied. Rather, only the selected region needs to be copied.
This justifies the need for clonePartial. Since clonePartial is obviously the more complicated of the two, we will restrict ourselves
to showing and discussing this function.
clonePartial takes two arguments; the starttime and endtime in seconds to clone. The times are relative to the beginning of the clip. These times
need to be converted to indices into our byte array, to know the bytes that need to be copied. There is a minor caveat however. If we are dealing with 16-bit audio, then
it is possible that the computed indices may be odd and thus not aligned with the samples. This is not allowed, so we must force sample alignment by adding 1
to the index if required. Now, all that remains is to make a new byte array large enough to hold the section we are cloning, copy the data and return a new
WaveClip constructed from this byte data. The new WaveClip inherits the track number and the format from its parent and has its starttime computed as the
starttime of the parent waveclip plus the starttime for copying given as argument to the function. The code is given below:
public WaveClip clonePartial(double copystart, double copyend) {
	//Convert times to sample numbers
	int startsample   = (int)(copystart * samplerate * framesize);
	int endsample     = (int)(copyend * samplerate * framesize);

	//Force sample alignment
	if(startsample % framesize != 0) startsample++;
	if(endsample % framesize != 0) endsample++;

	endsample = Math.min(endsample, packeddata.length);

	byte[] partdata = new byte[endsample - startsample];

	//Copy
	int j = 0;
	for(int i = startsample; i < endsample; i++) {
	    partdata[j] = packeddata[i];
	    j++;
	}

	return new WaveClip(partdata, format, track, starttime + copystart);
}
A WaveClip may need to be split in two for several reasons. For one thing we have a tool for doing exactly that - namely the split tool, so of course we need
that functionality. But the need for splitting can also arise from the cut operation. If the user cuts out a piece of a WaveClip, the clip needs to be split into
two or even three pieces. One such clip will be stored in the clipboard, while the others will remain visible (and audible).
The method splitInTwo splits a WaveClip in two and returns the second half. The WaveClip that the method was invoked on will become the first part.
The method takes as argument a splittime, measured in seconds from the beginning of the clip. The value is a double as usual to allow any fraction of a second
to be valid input. Splitting now involves creating two byte arrays, filling one with data before the split time and the other with data after the split time.
Again we have the issue of sample alignment when computing indices into the byte arrays. This is resolved as with clonePartial. Finally the WaveClip
that the method was invoked on has its packed data set to the first byte array, and the Clip is reloaded. Also the endtime of the clip is recomputed since the clip
now has a length of splittime seconds. The method returns a new WaveClip constructed from the
second byte array. The code is given below:
public WaveClip splitInTwo(double splittime) throws Exception {
	//Convert splittime to sample number
	int splitsample = (int)(splittime * samplerate * framesize);

	//Force sample alignment
	if(splitsample % framesize != 0) splitsample++;

	byte[] clip1data = new byte[splitsample];
	byte[] clip2data = new byte[packeddata.length - clip1data.length];

	//Copy
	for(int i = 0; i < clip1data.length; i++)
		clip1data[i] = packeddata[i];

	for(int i = 0; i < clip2data.length; i++)
		clip2data[i] = packeddata[clip1data.length + i];

	packeddata       = clip1data;

	//Reload clip
	clip             = AudioSystem.getClip();
	clip.open(format, packeddata, 0, packeddata.length);

	WaveClip clip2 = new WaveClip(clip2data, format, track, starttime + splittime);

	endtime = starttime + splittime;

	return clip2;
}
Five methods relate to playback of a WaveClip. Most importantly we have playFromPosition, which given a position in seconds, starts playback of the
clip from that position. We use the setMicroSecondPosition method of a Clip to achieve this.
Playback is ignored, however, if the track in which the WaveClip resides is muted:
public void playFromPosition(double pos) {
	clip.stop();
	clip.flush();
	clip.setMicrosecondPosition((long)(pos * 1000000));
	if(!SequenceView.muted[track-1]) {
		clip.start();
		playback = true;
	}
}
The stop and getPosition methods are straightforward:
public void stop() {
	clip.stop();
	playback = false;
}

public double getPosition() {
	return (clip.getMicrosecondPosition() * 0.000001);
}
The isRuning method probably sounds like a trivial one to implement. However, we did not find that to be the case. Although a Clip has methods for
determining whether the clip is running or not, these do not seem to have the effect that one would expect. Neither isActive or isRunning
could be used to properly determine whether the clip was involved in audio playback or not. The methods seem to return false too soon (before the clip finishes).
Therefore we tried to come up with a scheme for determining whether the clip was playing or not. An aid in this is the variable playback, which is set
to true in the play methods and to false in the stop method. As a further condition for the clip to be running, we require the position to be before the end of the
clip (measured with a certain margin, since the endposition and the position returned by getMicrosecondPosition do not coincide exactly. The result
of this discussion is the code given below:
public boolean isRunning() {
	boolean running = playback &&
			((double)clip.getMicrosecondPosition() * 0.000001) < (endtime - starttime - 0.01);
	if(running)
		return true;

	return false;
}
There are a number of methods for altering the data of the WaveClip. We will by no means go through them all since they are very similar in nature. The idea in all
of them goes along the following lines. Each method takes a starttime and an endtime as parameters. First of all it is tested whether the clip is even affected by
the transformation (it must have a part of it between starttime and endtime and must be selected - either directly or because it lies between the left and
right markers set in the sequence view). Then the data is unpacked to its double representation. The transformation is applied to the relevant subarray of this
double array and finally data is packed back into the byte array and the clip is reloaded with the new data. Again forcing sample alignment is necessary as was
discussed previously in the context of the clonePartial method. The code that performs the transformation on the double array is decoupled from
the WaveClip class and may be found in one of the filter classes. An exception to this is the amplification transformation, since it is so simple.
As an example transformation method we will give the code for amplifySelection. This method actually comes in two variants - one that just amplifies
by a fixed amount (corresponding to the user having selected the simple mode from the amplification dialog) and one that amplifies using a graph. We will give the
code for the latter more interesting case. The first argument to the method is of type SplineInterpolation, which is an abstract class representing either a linear
or cubic spline interpolation technique. This object has a convenient method getY that given a timestamp will return the y-value of the graph at that
point. The interpretation of the y-value in this context is that it will be the amplification factor. Thus a y-value of 2 will double the amplitude of that sample.
From the above discussions the code should now be readable:
/*Amplifies all samples that lie between mint and maxt (absolute time)
by the amplification signal specified by amplifycurve*/
public void amplifyRegion(SplineInterpolation spline, double mint, double maxt) throws Exception {
	if(starttime > maxt || endtime < mint)
		return; //clip not within region
	if(SequenceView.leftmarker < 0.0 && SequenceView.rightmarker < 0.0 && !selected)
		return; //clip not selected and no region

	unpackdata();

	int samplestart = (int)((mint - starttime) * samplerate);
	int sampleend   = (int)((maxt - starttime) * samplerate);

	//Force sample alignment
	if(samplestart % framesize != 0) samplestart++;
	if(sampleend % framesize != 0) sampleend++;

	samplestart     = Math.max(0, samplestart);
	sampleend       = Math.min(data.length, sampleend);

	// ---- MONO ---- //
	if(channels == 1) {
		for(int i = samplestart; i < sampleend; i++) {
			double sampletime    = starttime + (double)i / (double)(samplerate);
			double amplifyfactor = spline.getY(sampletime);

			data[i] *= amplifyfactor;
		}
	}
	// ---- STEREO ---- //
	else {
		throw new Exception("Only mono is supported");
	}

	//Convert back to bytes
	packdata();

	//Reload clip
	clip             = AudioSystem.getClip();
	clip.open(format, packeddata, 0, packeddata.length);
}
The paint method of the WaveClip class is by far the most complex one. However, it is more or less purely GUI-related code, and we will not spend a lot
of time going through all the details and we will not list the code here either (please go to WaveClip.java to see the code if you are curious). However,
the code is not completely irrelevant to the course since it involves the problem of visualizing audio. Therefore we will (rather briefly) go through the ideas
of the code.
A WaveClip is capable of drawing itself in two different contexts. The context of the sequence view and the context of a dialog (such as the amplify dialog, that
also shows WaveClips). The first part of the paint method computes a number of values needed to map between sample values and pixel-coordinates.
In the case of the drawing context being the sequence view, we query the sequence view for the current visible window in order to know how to map from samples
to pixel-coordinates. The width of a pixel measured in samples is also computed. This is needed in order to determine the spacing between two sample values that
we need to draw the clip. It is not necessary to sample more often than this, because sub-pixel precision can obviously not be seen. We also compute the first
and last sample that is visible on screen. We now compute an array of pixel coordinates for later use. This is done by stepping through each pixel in the x-direction
that will correspond to a part of the clip, and computing the corresponding y-value from the sample value at that point.
Finally, lines are drawn between consecutive pixel coordinates to form the wave-curve.
Drawing audio is not completely trivial to debug. When does it look correct? In order to ensure that our drawing of audio was correct we used PD. PD helped us determine when we got the correct drawing. We made a small PD patch for loading in a fixed wave clip and then used the table object to inspect what the waveform looked like. By choosing a window that was directly implementable in WaveEdit we were able to compare the waveforms directly - the one produced by PD and the one produced by WaveEdit. When WaveEdit is zoomed all the way in, the window has a width of 0.1 seconds. We used a 22050 Hz waveclip so the first 0.1 seconds correspond to the first 2205 samples of audio. We had PD display this range while we let WaveEdit show the first 0.1 seconds of audio. Below the two outputs are shown. As can be seen they are identical, and thus we are confident that our wave rendering is correctly implemented.


WaveClips are able to save themselves to and restore themselves from .wep project files. Saving a WaveClip to a file simply involves writing all of the instance
variables that we need to the file. Reading a WaveClip just involves reading the variables back in the same order they were stored in. A little more work is
required for the loading phase. First of all not all varibles are saved to disk, since some variables can be inferred from the contents of others - second of all
Java technicalities makes it a little more cumbersome to read back data from the file, than it is to write them. We use an ObjectOutputStream for saving
data and an ObjectInputStream for loading data.
We have by no means described all the methods of WaveClip. There are also methods for selecting, deselecting, getting and setting the track, getting an HTML
description of the clip (for the information dialog) and more. But we have gone through the methods that we consider to be most important and interesting
from the point of view of the course. This concludes the description of the WaveClip class.
Moving one step up in the hierarchy from the WaveClip class takes us to the WaveManager. The purpose of the WaveManager class is to manage the different
WaveClips. All methods that may involve more than one WaveClip are handled by the WaveManager. Such operations include copying, cutting, pasting and applying
transformations. All of the WaveClips are stored in a vector, which is kept sorted by starttime at all times. Keeping it sorted in this way makes it easier to
play the sequence. The WaveManager also keeps an additional vector of WaveClips called clipboard. When the user cuts or copies data it will be
stored in the clipboard for later retrieval by performing a paste operation. The WaveManager has a number of interesting methods. Three for performing cut, copy and
paste operations, a method for deleting all selected clips, methods for adding a WaveClip to the collection, for rendering the entire sequence to a file and
for applying transformations.
A small auxiliary method findInsertionPosition is used for keeping the vector of WaveClips sorted. Given the starttime of a clip, it computes the index
into the vector where that clip should be inserted to preserve the ordering:
private int findInsertionPosition(double starttime) {
	//The vector is kept sorted by starttime. Find out where this clip should be inserted
	//to preserve the ordering.
	int insertionposition = 0;
	for(int i = 0; i < clips.size(); i++) {
		WaveClip clip = clips.get(i);
		if(starttime > clip.starttime)
			insertionposition++;
		else
			break;
	}

	return insertionposition;
}
We next describe the implementation of copy. When the user chooses Edit > Copy, all selected clips should be copied and the copy moved to the clipboard
vector. Since there are two ways to perform selections in WaveEdit, this complicates the code a little. Recall, that the user may either select some region of
a track, by placing the left and right markers, or he may alternatively select a number of whole clips using the select tool. If a region is set (both markers are
placed) then this takes precedence over having individual clips selected. This means that only the clips or parts of clips that lie in between the markers will
be copied - even though clips outside this region could potentially be selected. This is chosen mostly as a convenience for the user, who will probably be surprised
if clips outside the selected region are affected (even though they are actually selected). We begin by discussing the case, where the user has selected a region
using the left and right markers. To better appreciate what must be taken into consideration when
implementing the copy operation, please have a look at the figure below.

In this situation the user has selected a region with the left and right markers. A part of the first clip, and a part of the third clip should be copied, while
all of the second clip should be copied. The method clonePartial that was described during the discussion of the WaveClip class now comes in handy.
We will need it to deal with clips like the first and third one in the figure. A third case (not shown in the figure) is when the left and right markers are both
placed inside a WaveClip - but again we can just use clonePartial to copy the required segment. We are now in a position to outline the implementation
of the copy operation in the case where the selection is made from the two markers. We consider each WaveClip in turn. If there is an overlap between the interval
of the WaveClip (that goes from its starttime to its endtime) and the marked region, then we will need to perform some copying. Otherwise we can disregard the clip as not
being affected by the operation. If the clip is affected there are three cases:
WaveClip. We need to copy from SequenceView.leftmarker - clip.starttimeSequenceView.rightmarker - clip.starttimeclonePartial).WaveClip, but the right marker is not. This means we should copy everything from SequenceView.leftmarker - clip.starttimeWaveClip.WaveClip, but the left marker is not. This means we should copy everything from the beginning of the WaveClip until
SequenceView.rightmarker - clip.starttime
All copies are inserted into the clipboard vector. If a clip is entirely inside the selected region, we may copy the entire clip using clone. This is also how we handle the case, where the user has
selected on a per-clip basis and not using the markers. Here all selected clips are simply cloned and the copy moved to the clipboard. The time has come to show
the source code for the copy method.
public void copy() {
    clipboard.clear();
    if(SequenceView.leftmarker > 0.0 && SequenceView.rightmarker > 0.0) {
        //Copy selected region

        if(SequenceView.leftmarker > 0.0 && SequenceView.rightmarker > 0.0) {
            // ---- Copy according to the selected region (between the markers) ---- //
            for(int i = 0; i < clips.size(); i++) {
                WaveClip clip = clips.get(i);
                //See if we can discard this clip as irrelevant now
                if(SequenceView.activetrack != clip.getTrack() ||
                    SequenceView.rightmarker <= clip.starttime ||
                    SequenceView.leftmarker >= clip.endtime)
                        continue;

                if(SequenceView.leftmarker > clip.starttime &&
                    SequenceView.leftmarker < clip.endtime)
                {
                    //Left marker is inside clip - we need to copy part of the clip
                    WaveClip part;

                    if(SequenceView.rightmarker < clip.endtime)
                    {
                        part = clip.clonePartial(SequenceView.leftmarker - clip.starttime,
                                                 SequenceView.rightmarker - clip.starttime);
                    }
                    else {
                        part = clip.clonePartial(SequenceView.leftmarker - clip.starttime,
                                                 clip.endtime - clip.starttime);
                    }

                    clipboard.add(part);
                }
                else if(SequenceView.rightmarker > clip.starttime &&
                    SequenceView.rightmarker < clip.endtime)
                {
                    //Right marker is inside the clip
                    //(but left marker is not, since if it were, the if case would apply!)
                    WaveClip part = clip.clonePartial(0.0,
                                                      SequenceView.rightmarker - clip.starttime);
                    clipboard.add(part);
                }
                else {
                    //Clip entirely in region.
                        clipboard.add(clip.clone());
                }
            }
        }
    }
    else {
        // ---- Copy selected clips ---- //
        for(int i = 0; i < clips.size(); i++) {
            WaveClip clip = clips.get(i);
            if(clip.isSelected()) {
                clipboard.add(clip.clone());
            }
        }
    }
    WaveEdit.pasteitem.setEnabled(true);
}
The cut operation is more difficult to implement than the copy operation. This is because exisiting WaveClips may need to be split, when the user cuts
when having selected a region with the left and right markers. Like before, in the case of selection using markers, we have three cases to consider. The cases
were introduced during the discussion of the copy operation. For case 1, the WaveClip needs to be split into three clips. The first and the third clip will remain
visible and the second one is cut out and moved to the clipboard. The splitInTwo method of the WaveClip class is used to perform the splits. Case 2 and 3
are simpler and only require one split operation. The cut operation may thus increase the total number of WaveClips - new WaveClips must be inserted at the correct
position in the vector to maintain the proper ordering. Since the cut operation is also implemented by looping over each WaveClip in the vector, a subtle issue arises.
Because we add clips to this vector as we go along, we must ensure that we don't end up processing a clip twice or skipping one. Therefore we always restart the loop whenever something
was added to the vector. The overhead should not be bad as we only expect the number of WaveClips to be in the order of a few hundred at most
under normal circumstances. Apart from adding new
clips we of course also need to delete clips that are cut out. They are deleted, but at the same time inserted into the clipboard vector for later retrieval.
We now give the code for cut:
public void cut() {
    clipboard.clear();

    if(SequenceView.leftmarker > 0.0 && SequenceView.rightmarker > 0.0) {
        // ---- Cut according to the selected region (between the markers) ---- //
        for(int i = 0; i < clips.size(); i++) {
            WaveClip clip = clips.get(i);
            //See if we can discard this clip as irrelevant now
            if(SequenceView.activetrack != clip.getTrack() ||
               SequenceView.rightmarker <= clip.starttime ||
               SequenceView.leftmarker >= clip.endtime)
                continue;

            try {
                if(SequenceView.leftmarker > clip.starttime && SequenceView.leftmarker < clip.endtime) {

                    //Left marker is inside the clip. So this clip needs to be split
                    WaveClip secondhalf = clip.splitInTwo(SequenceView.leftmarker - clip.starttime);

                    //Selection region entirely contained inside clip - so we need another split!
                    if(SequenceView.rightmarker > secondhalf.starttime &&
                       SequenceView.rightmarker < secondhalf.endtime) {
                        WaveClip lastthird = secondhalf.splitInTwo(SequenceView.rightmarker - secondhalf.starttime);

                        //Now secondhalf contains the cut-out part. We need to add lastthird to the clip vector
                        clips.add(findInsertionPosition(lastthird.starttime), lastthird);

                        //We added another clip, changing the order of all clips.
                        //Restart process so we don't jump over any clips.
                        i = -1;
                    }

                    clipboard.add(secondhalf);
                }
               else if(SequenceView.rightmarker > clip.starttime && SequenceView.rightmarker < clip.endtime) {
                    //Right marker is inside the clip (but left marker is not, since if it were,
                    //the if case would apply!). So this clip needs to be split
                    WaveClip secondhalf = clip.splitInTwo(SequenceView.rightmarker - clip.starttime);

                    //Now clip should be added to the clipboard (and removed from the clip vector)
                    //and secondhalf should be added to the clip vector

                    clips.remove(clip);
                    clips.add(findInsertionPosition(secondhalf.starttime), secondhalf);
                    clipboard.add(clip);

                    //Again since we restructured the vector we need to start from scratch
                    i = -1;
                }
                else {
                    //(otherwise we continue to next iteration) then this clip must be entirely contained
                    //in the selected region. Cut the entire clip
                    clips.remove(clip);
                    clipboard.add(clip);

                    //Again since we restructured the vector we need to start from scratch
                    i = -1;
                }
            }
            catch(Exception e) {
                e.printStackTrace();
            }
        }
    }
    else {
        // ---- Cut selected clips ---- //
        Vector clipstoremove = new Vector();

        for(int i = 0; i < clips.size(); i++) {
            WaveClip clip = clips.get(i);
            if(clip.isSelected()) {
                clipstoremove.add(clip);
                clipboard.add(clip);
            }
        }

        for(int i = 0; i < clipstoremove.size(); i++) {
            clips.remove(clipstoremove.get(i));
        }
    }
    WaveEdit.pasteitem.setEnabled(true);
}
The paste operation is simpler than both the copy and the cut operations. All the clips in the clipboard should maintain their relative timings when they
are pasted, but they will need to be translated in time to the correct position. The starttime of the earliest of the clips should be the postion of the
cursor line. So all WaveClips need to be moved by c - f where, c is the position of the red cursorline and f is the starttime of the
first WaveClip in the clipboard. Since the clips in the clipboard are not ordered, we need to run through them all to determine f.
To allow multiple pasting without a new copy, we don't just take the contents of the clipboard, change the timings and move them from the clipboard to the
vector of WaveClips. Instead we leave them in the clipboard and work with a copy of them. In this way we are able to support pasting more than once, which
is a nice feature to have. The code is given below:
public void paste() {
	//Find position of first clip in clipboard
	double firstposition = 99999.0;
	for(int i = 0; i < clipboard.size(); i++) {
		WaveClip clip = clipboard.get(i);
		if(clip.starttime < firstposition) firstposition = clip.starttime;
	}

	//Compute how much to offset each clip in the clipboard before insertion
	double deltatime = SequenceView.cursor - firstposition;

	for(int i = 0; i < clipboard.size(); i++) {
		WaveClip clip = clipboard.get(i);
		WaveClip copy = clip.clone();

		//Move clip to the active track
		copy.setTrack(SequenceView.activetrack);

		//Move clip to correct paste position
		copy.starttime  += deltatime;
		copy.endtime    += deltatime;

		//Insert it into the clip vector
		clips.add(findInsertionPosition(copy.starttime), copy);
	}
}
Given a File, the WaveManager class is able to load wave data from that file and create a new WaveClip from it. Upon load, the data is converted to PCM_SIGNED
and big-endian format. The code is shown below:
public void addWaveFile(File file) throws Exception {
	if(file == null) return;

	int track                = SequenceView.activetrack;
	double starttime         = SequenceView.cursor;
	AudioInputStream astream = AudioSystem.getAudioInputStream(file);

	AudioFormat targetformat = new AudioFormat(astream.getFormat().getSampleRate(),
	8*astream.getFormat().getFrameSize(),1,true,true);

	AudioInputStream convertedstream;
	if (AudioSystem.isConversionSupported(targetformat, astream.getFormat())) {
		convertedstream = AudioSystem.getAudioInputStream(targetformat, astream);
	}
	else {
		throw new Exception("Unable to convert to PCM_SIGNED, bigEndian format");
	}

	if(convertedstream.getFormat().getEncoding() != AudioFormat.Encoding.PCM_SIGNED)
		throw new Exception("Only PCM_SIGNED is supported");
	if(!convertedstream.getFormat().isBigEndian())
		throw new Exception("Only Big-Endian is supported");

	int length               = (int)(convertedstream.getFrameLength() *
					convertedstream.getFormat().getFrameSize());
	DataInputStream dstream  = new DataInputStream(convertedstream);
	byte[] samples           = new byte[length];
	dstream.readFully(samples);

	clips.add(findInsertionPosition(starttime),
		new WaveClip(samples, convertedstream.getFormat(), track, starttime));
	WaveEdit.renderitem.setEnabled(true);
}

WaveEdit support inserting sine wave clips by choosing Insert > Sine Wave. From the values entered by the user we obtain the duration in seconds,
the volume in percent, the sample rate in Hz and the frame size in bytes as parameters for the method addSineWave. First we compute the size
of the byte array needed to store the audio. This depends on the duration, the sample rate and the frame size. Next we compute the maximal signal value
that the wave should have. If the user chose 50% volume and we are working with 16-bit audio then the max value will be 16383. If the user chose 100% volume
and we are working with 8-bit audio then the max value will be 127 and so on. Now, the i'th sample is calculated as follows:
sin((i mod spl)*2π / spl) * msv
where spl is the number of samples involved in one period of the sine wave and msv is the maximal signal value discussed above. Using the modulo operation ensures that the function is periodic with period spl as desired. Now,
spl = F * R / f
where F is the frame size in bytes, R is the sample rate in Hz and f is the frequency of the sine wave in Hz. We omit the code for
addSineWave here, but it can be found in WaveManager.java.

Sawtooth waves can be created by choosing Insert > Sawtooth Wave. Each sample is then generated according to the formula:
V * msv
where V is the sawtooth value - a value ranging from -1.0 up to 1.0 and msv is again the maximal signal value. For every sample V is incremented by:
2 / spl
where spl is again the number of samples involved in one period of the waveform. When V reaches a value above 1.0 it is immediately reset back to -1.0, thus generating the sharp sawtooth-like form of the wave.

Pulse waves take on only two values, centered around 0. One is below 0, the other above 0. The user is able to configure the pulse width. The pulse width is measured in percent and indicates how large a portion of the total number of samples that have the high value. If the pulse width is 50%, then half the samples are less than 0 and half the samples are greater than 0. A pulse width larger than 50% will make more samples greater than 0. Since we compute the number of samples in one period of the waveform, spl, we may compute how many samples in such a period that should be greater than 0 by using the pulse width. We call the resulting number of samples pw. Now we are in position to calculate the samples for a period by first generating the quantity V analogous to the V from the discussion of the sawtooth wave. V is either -1.0 or 1.0. The first spl - pw samples get V = -1.0 and the remaining pw samples get V = 1.0. This procedure is repeated for each period. Again the formula for generating the samples is as before:
V * msv

White noise is generated by generating a random number between -1.0 and 1.0 and then multiplying by msv.
The WaveManger class has a method for each type of audio transformation supported in WaveEdit. Thus, there is a method for each filter etc. These methods are
very simple - they just loop through all the WaveClips in the vector of WaveClips and invoke the corresponding transformation method. There is
no need to check whether the transformation should be applied (it shouldn't if the clip is not selected) - these decisions are made in the WaveClip class itself
as we have already seen during the discussion of the WaveClip class. Therefore there is not much to say about these methods here.
There were two important options we wanted to give to the user. The first one was to be able to choose which part of the project (start and end time) he wanted to save, and in which format.
The user gives this information through a dialogbox and the result is given to the program.
The resulting wave file is first built up in a WaveClip, which later is saved to a file. The first thing to calculate is how many bytes are needed to store the data that is going to be saved. This is done by: length * samplerate * framesize (in bytes).
We take each WaveClip in the project, and if a part of it lies between the specified start and end times for the rendering, then we take that part and add its samples to the result samples one by one. Of course, we need to convert the format and also handle overflow (if two samples with a large (or small) amplitude are added).
The overflow problem is solved by the following function:
/**
 *@param d: A value representing a sample in percent.
 *@result: A value representing a compressed sample in percent.
 */
private int compress(int d)
{
	if(d < 80) return d;
	else return 100 - 400 / (d - 60);
}
This compression is also done with percentage less than 20. We notice that the percent can be both larger than 100 and less than 0 when calculated. This is because it is in percent of one sample value and we are compressing a sum of sample values. Thus such a sum can be much larger than a single sample value.
When converting between formats we need to convert both framesize and samplerate. For converting the framesize we simply take a value in the interval [-32768, 32767] and map it to the interval [-128, 127] or the other way around. Though, there is still the problem of reading and writing a two byte value into an integer:
	// Reading
	int isample = packeddata[i*2];
	isample <<= 8;
	isample |= (packeddata[i*2+1] & 0xFF);
	// Writing
	packeddata[i*2] = (byte)(resultSample >> 8);
	packeddata[i*2+1] = (byte)(resultSample);
where i is the sample number, packeddata is our byte array (of samples) and resultSample is the sample(integer) we want to write.
For the samplerate we may need to reduce the number of samples (if the target sample rate is below the actual sample rate of the clip) or we may need to insert extra samples (if the
target sample rate is above the actual sample rate). If we need to reduce the samplerate (e.g. from 44100Hz to 22050Hz) we take two samples from the clip and use the average value.
If we need to increase the samplerate we use an average between this sample and the next and insert it in between two samples.
For each new clip we want to save, we calculate the sample number to start from within the clip, and within the resulting clip, plus the number of samples to read / write.
The number of samples is calculated like before. We obtain:
min(endtime, clip.endtime) - max(starttime, clip.starttime);
When rendering a WaveClip, we need to compute where its data needs to be copied to in the result clip. This is computed as follows:
max(starttime, clip.starttime) - starttime) * targetSampleRate;
Since the user may wish to only save a region, it is possible that only a part of each WaveClip needs to be copied to the result. To determine the sample inside the current WaveClip
where copying must start, we use the following formula:
max(0.0, starttime - clip.starttime);
This is what is needed to convert from one format to another and is done sample by sample. The rest is done by looping over the clips and the samples to write. When done, we save the resulting clip.
We did try to use the components of the AudioSystem in Java to convert from one format to another, but always got the error that this conversion was not supported. This is why we convert the clips ourselves.
The WaveManager has methods for saving and loading .wep project files. The contents of a .wep file has a rather simple structure. First comes an integer giving
the number of WaveClips, then each WaveClip is stored separately in the file. The loading and restoring of a single WaveClip is implemented inside the WaveClip
class as was discussed earlier. All that needs to be done to load or save a project is to run through all the WaveClips instructing them to either load or save
themselves to/from the .wep file.
Only whole clips may be deleted - one cannot select a region and then press DELETE to have it deleted. However, one may use the split tool to cut out the area
that should be deleted and then delete that clip. When the user hits DELETE all WaveClips are considered. If the clip is selected it is removed from the vector
of WaveClips. The code is not shown.
Playback is handled by a separate class - the PlaybackThread. Thus, there is not so much to it in the implementation of playback as
seen from the WaveManager's point of view. The implementation of stop is equally simple. It almost just involves killing the PlaybackThread, but this is, however, not quite enough. This only stops the sequencer behaviour of the PlaybackThread so that no new clips will be started. However, clips that are already
playing won't be affected. Thus in addition, stop also runs through each WaveClip manually and calls its stop method.
The code for both playback and stop is given below:
private void playback() {
	double cursor  = SequenceView.cursor;

	if(playbackthread != null)
		playbackthread.interrupt();

	playbackthread = new PlaybackThread(guipanel, this);
	playbackthread.start();
}

private void stop() {
	if(playbackthread != null) {
		playbackthread.interrupt();
		playbackthread = null;
	}

	for(int i = 0; i < clips.size(); i++) {
		clips.get(i).stop();
	}
}
This concludes the description of the WaveManager class.
The SequenceView
Since the sequence view may be zoomed in/out on and scrolled, we keep track of the portion currently visible, as well as the zoom factor.
The horizontal direction represents time in a continuous fashion. Describing the currently visible area amounts to describing the leftmost
and rightmost position visible, measured in seconds. These values are stored in the variables: secondsleft and secondsright.
The zoom factor is also stored because we need to keep track of how far in we have zoomed. We may zoom by a factor of 1, 2, 6, 12, 60, 120, 240 and 1200.
If the zoom factor is 1 the window is 120 seconds wide. The numbers above are chosen because they divide 120 in a nice way. It is necessary to be able to zoom in
quite far in order to really see the details of the waveforms - therefore it is possible to zoom in by such a high factor. Zoomed all the way in the sequence view
shows only a 0.1 second interval. When zooming out on areas close to 0 we must ensure that we never risk the window starting to show times before 0 seconds.
Finally, we take care to always move the cursor into view, when the user zooms.
To get a feeling for the kind of code found in this class we give the implementation of zoomin. The rest of the code of SequenceView
public void zoomin() {
	double delta = 0.0;
	switch(zoom) {
	case 1:
	    delta = 30.0; zoom = 2;
	    break;
	case 2:
	    delta = 20.0; zoom = 6;
	    break;
	case 6:
	    delta = 5.0; zoom = 12;
	    break;
	case 12:
	    delta = 4.0; zoom = 60;
	    break;
	case 60:
	    delta = 0.5; zoom = 120;
	    break;
	case 120:
	    delta = 0.25; zoom = 240;
	    break;
	case 240:
	    delta = 0.20; zoom = 1200;
	    break;
	}

	SequenceView.secondsleft  = SequenceView.secondsleft + delta ;
	SequenceView.secondsright = SequenceView.secondsright - delta ;

	if(SequenceView.cursor < SequenceView.secondsleft)
		SequenceView.cursor = SequenceView.secondsleft;
	if(SequenceView.cursor > SequenceView.secondsright)
		SequenceView.cursor = SequenceView.secondsright;
}
Pressing a scroll button will move the visible area by a fixed amount, depending on the current zoom-level. We ensure that the user does not scroll below 0 seconds.
Painting the sequence view (updating its graphical representation) involves a number of tasks. First of all, all tracks must be drawn. We use rectangles with
different colors to draw them. The highlighted (active) track is drawn using a white rectangle, while the remaining tracks are drawn in gray. The time labels
must be computed from the current values of secondsleft and secondsright. We use the DecimalFormat class to format the
floating point values so they only show two decimals. This avoids cluttering the top of the sequence view with long values, when the user has zoomed in so far,
that whole seconds are no longer shown in the labels. The SequenceViewpaint is a little long and cumbersome and since it is not so interesting from the point of view of this course, we omit it entirely
here.
The GUIPanel is a kind of GUI manager class. Most events flow through this class (all mouse events and keyboard events). Only events related to the user
selecting something from one of the menus is not handled by this class. This is instead handled by the class WaveEdit. The tasks of the GUIPanel are given
below:
The GUIPanel has a WaveManager, a ToolPalette and a SequenceViewGUIPanels paint method
ensures that the different GUI components are drawn in the proper order (background to foreground) so that everything looks nice:
public void paintComponent(Graphics g) {
	super.paintComponent(g);
	seqview.paint(g);
	toolpalette.paint(g,this);
	wavmanager.paint(g, WaveClip.SequenceView);
	seqview.paintcursor(g);
	setcustomcursor(toolpalette.activetoolid);
}
For instance the cursor must be drawn last, because we want it to be on top of everything else. The sequence view must be drawn before the wavemanger draws
all of its WaveClips, since otherwise they would be hidden by the sequence view itself and so on.
GUIPanel implements a number of Java interfaces for getting user input from the keyboard or from the mouse: MouseListener,
MouseMotionListener and KeyListener. Futhermore we use the so-called input map of the class for storing key-bindings for a number
of shortcuts (such as the ones for opening and saving projects). Mouse events are captured by the class and the appropriate method will be called. For instance
the mouse click method looks as follows:
public void mouseClicked(MouseEvent e) {
    int mouseX = e.getX();
    int mouseY = e.getY();

    if(mouseX >= seqview.SV_X && mouseX <= seqview.SV_X + seqview.SV_W
        && mouseY <= seqview.SV_Y + seqview.SV_H)
    {
        //User clicked inside the SequenceView
        if(mouseY <= seqview.SV_Y){
            //User clicked above the SequenceView (so he wants to move cursor)
            seqview.cursormoveclick(mouseX);
        }
        else {
            //User clicked in, and not above the SequenceView
            toolpalette.sendMouseClickToActiveTool(mouseX, mouseY);
        }
    }
    else {
    	//User did not click on SequenceView, so let the ToolPalette decide if a button was hit
        int button = toolpalette.click(mouseX, mouseY);
        switch(button) {
            case ToolPalette.HIT_PLUS:
                seqview.zoomin(); break;
            case ToolPalette.HIT_MINUS:
                seqview.zoomout(); break;
            case ToolPalette.HIT_LEFT:
                seqview.scrollleft(); break;
            case ToolPalette.HIT_RIGHT:
                seqview.scrollright(); break;
            case ToolPalette.TRACK_SEL_1:
                SequenceView.activetrack = 1; break;
            case ToolPalette.TRACK_SEL_2:
                SequenceView.activetrack = 2; break;
            case ToolPalette.TRACK_SEL_3:
                SequenceView.activetrack = 3; break;
            case ToolPalette.TRACK_SEL_4:
                SequenceView.activetrack = 4; break;
            case ToolPalette.TRACK_TOGGLEMUTE_1:
                SequenceView.muted[0] = !SequenceView.muted[0]; break;
            case ToolPalette.TRACK_TOGGLEMUTE_2:
                SequenceView.muted[1] = !SequenceView.muted[1]; break;
            case ToolPalette.TRACK_TOGGLEMUTE_3:
                SequenceView.muted[2] = !SequenceView.muted[2]; break;
            case ToolPalette.TRACK_TOGGLEMUTE_4:
                SequenceView.muted[3] = !SequenceView.muted[3]; break;
            case ToolPalette.HIT_DESELECT:
                seqview.deselect(); wavmanager.deselect(); break;
            case ToolPalette.HIT_REWIND:
                SequenceView.cursor = 0.0; break;
            case ToolPalette.HIT_PLAY:
                wavmanager.togglePlay(); break;
            default: break;
        }
    }

    repaint();
}
As can be seen, the ToolPalette has a nice function click that returns which button the user clicked on. Then, the GUIPanel may take the
appropriate action. The click event is also forwarded to the active tool (if appropriate) by the ToolPalette. For the mouse drag event, the event is
passed on to the ToolPalette, which forwards it to the active tool. We will not go over all event processing in GUIPanel - the above example should give an
idea of what is going on inside GUIPanel.
GUIPanel has a number of different cursors that it can display. The different tools have different cursor icons associated with them, so the user may easily see,
which tool he is using right now. Also for a tool like the ZoomTool it is useful to have a cursor icon, since the tool can be in different states (zoom in or
zoom out). If the user has the SHIFT key pressed, then the ZoomTool performs a zoom out action - otherwise a zoom in action. This is indicated by having two
different cursors - one with a small '+' and one with a small '-' depending on the state of the ZoomTool. Changing cursors is done, when the user selects a new
tool from the ToolPalette (either by clicking on the ToolPalette or by using a keyboard shortcut for that tool).
The different cursors are created in the constructor. Such a constructor takes an image file as argument, where the cursor image is stored. It also need a so called hot spot position, which is the pixel coordinate of the cursor image that is the hotspot. The hotspot is the coordinates the application will consider
the click being at. For instance the hotspot of an arrow icon is at the tip of the arrow. We switch between the different cursors in the mouseMoved
mouse event handler. While the mouse is not over the sequence view, we display a simple arrow. It would not be intuitive to click on a button with a zoom cursor. The custom cursors only become active, when the mouse is over the sequence view. Thus the code of mouseMoved becomes:
public void mouseMoved(MouseEvent e) {
    int mouseX = e.getX();
    int mouseY = e.getY();
    if(mouseX >= seqview.SV_X && mouseX <= seqview.SV_X + seqview.SV_W && mouseY <= seqview.SV_Y + seqview.SV_H) {
    	setCursor(activecursor);
    }
    else {
    	setCursor(defaultcursor);
    }
}
The custom cursor is always kept in activecursor. Earlier we showed the code for paintComponent. Notice that we call the method
setcustomcursor from there. This sets the cursor to the appropriate style depending on the currently active tool:
private void setcustomcursor(int id)
{
	switch(id)
	{
		case ToolPalette.MOVE_TOOL: activecursor = movecursor; break;
		case ToolPalette.SELECT_TOOL: activecursor = selectcursor;  break;
		case ToolPalette.LEFT_MARKER: activecursor = leftmarkercursor; break;
		case ToolPalette.RIGHT_MARKER: activecursor = rightmarkercursor; break;
		case ToolPalette.SPLIT_TOOL: activecursor = splitcursor; break;
		case ToolPalette.ZOOM_TOOL: activecursor = zoomcursorplus; break;
	}
}
The switching between the two cursors for the ZoomTool is done in the event handler for the keyboard. We change it to zoomcursorminus when
the shift key is pressed.
The ToolPalette represents the part of the GUI that is not the SequenceViewToolPalette is responsible for drawing all these on screen and for determining, given mouse coordinates, which of the buttons (if any) was hit. Also
the ToolPalette manages the different tools. It has an instance of each type of tool, and a general instance of the abstract class Tool, which always holds
the currently active tool. The track-selection palette also falls under the domain of the tool-palette. Redrawing this involves drawing the highlighted track
in blue, drawing all of the muted icons correctly and so on. All in all there are lots of details involved in the implementation, but none are really that
interesting. We will only mention that mouse events are redirected to the active tool, which knows what to do with it.
Tool is an abstract class capturing the notion of a tool. A tool receives mouse messages from the ToolPalette; thus the Tool class has three methods, that
subclasses inherit (they may not need all of them though): mouseClick, mousePressed and mouseDrag.
The SelectTool inherits from the Tool class and overwrites the mouseClick method of the Tool class. When the user clicks the mouse in the
SequenceViewSelectTool as the active tool, then the SelectTool must figure out which WaveClip (if any) was hit. Thus we must convert a mouse click
(in pixel coordinates) to something we can use for determining if a WaveClip was hit. The x-coordinate of the mouse click must be converted into a time
value. How to perform this conversion depends on the currently visible area of the SequenceViewSequenceViewSequenceView
t = left + ((x - sx) / sw) * (right - left)
Why does this formula look like that? Well, if we break it down into its components it becomes quite clear what is going on. Computing x - sx
gives us the distance from the left border of the SequenceViewSequenceView
It remains to compute which of the four tracks was hit. This is much simpler. Let sy be the y-coordinate of the top border of the SequenceView
T = (y - sy) / th + 1
Once t and T have been computed we may look through each WaveClip in turn, comparing its track number and start and endtimes with T and
t. If starttime < t < endtime, and track = T then the WaveClip was hit.
As we go along looping over each WaveClip we deselect them as we go along (since clicking on one WaveClip deselects any other WaveClips that may be selected).
However, since WaveEdit supports multi-selection, if the user presses the SHIFT key while using the SelectTool we only perform this deselection in case
multiselect is not enabled. The SelectTool has methods for enabling and disabling multi-selection that are called by the GUIPanel, when it receives events for
SHIFT being pressed or released.
The MoveTool uses drag-events as its primary input. When one or more WaveClips are selected, dragging the mouse with the move tool, should move the clip around
in real time. We maintain the previous (x,y)-mouse coordinate so that we can compute the difference between the current coordinates and the previous ones - thus
computing how far the mouse has moved since last time. These values are then used to determine how much to move the WaveClip in time (or tracks). Difference in
x-coordinate is converted to a movement along the time axis, while difference in y-coordinate is converted to a movement from one track to another. Given the
change in x-coordinate dx (which may be negative) we may compute the change in time dt as follows:
dt = dx * (right - left) / sw
The notation used in the above formula mimics the one given in the section on the SelectTool. Please refer to that section, if you are unsure of what the quantities in the above expression mean.
Moving the WaveClip in time is simple: just add dt to both the starttime and the endtime of the clip. There are two caveats. Firstly we of course cannot
allow moving a WaveClip so that its starttime gets below 0 seconds. If that happens and we move the starttime to, say, -t where t > 0, then
we may remedy the situation by adding t to the starttime and the endtime. But there is a more subtle caveat. If the user has selected more than one WaveClip
then if one WaveClip is moved below 0 and subsequently corrected to 0, then we cannot allow the other WaveClips to keep moving by dt.
If we let them do that, then the selected WaveClips would move closer together - clearly an undesirable effect!
Instead we must look at
how much we actually moved the WaveClip. We moved it from starttime > 0 to 0 - in other words we moved it by a delta of -starttime, where starttime
is the starttime before we moved the WaveClip. Thus we must update dt to be equal to this new value, and move the remaining WaveClips by this dt
instead. This ensures that WaveClips remain at the same distance from one another, as we want.
The change in tracks, dT is given by the following formula:
dT = dy / TH
where TH is the hight (in pixels) of the SequenceView and dy is the delta in y-coordinates since the last time the mouseDrag
method was invoked.
The change in tracks has the same issues. If two clips are selected that reside in different tracks - one is in track 1 and the other in track 2, then if the user moves them upward then the first track cannot move up further, but the second one can. We cannot, however, allow the second clip to move upward, since that will move the clips closer together in terms of tracks. This is not what one would expect. Instead both clips should "block" and move no further. Since the clips are sorted by time and not by track, it is certainly possible that the first clip we encounter is the one in track 2. Therefore we resolve the situation by having an extra loop through all waveclips, checking whether the move in tracks is possible. For it to be possible, all selected clips must be movable by the computed delta value in tracks. Otherwise we don't touch any of the clips!
The value of dy must be kept updated - we only update the starty (the y-coordinate the last time mouseDrag was invoked) variable used to compute dy if we actually moved the clips. Thus,
dy will increment over time until it reaches a value sufficiently large (i.e. at least TH) - and then (if we are able to move all selected clips)
we will update it to become smaller again.
The MarkerTool encompasses both the left and right marker tools, since the implementation is so similar. A variable type tells which type of tool
it is. The MarkerTool overwrites only the mouseClicked method of Tool, since we only care about clicks. The only thing that must be done, is to place
the marker in question at the position clicked. We already know how to convert from pixel coordinates to a time (from the discussion of the SelectTool), so there
is not much to it. All that needs to be done is to set the SequenceView.leftmarker or SequenceView.rightmarker to the converted time.
Of course, it does not make sense to place the leftmarker right of the rightmarker. We do not allow this to happen. If the user attempts to do such a thing, he will
be confronted with a friendly dialog informing of the issue.
What exactly does the ZoomTool do? You will want to know, before you read about how to implement it. Well, when the user clicks on the SequenceView with the
ZoomTool as the active tool, then the SequenceView is zoomed in, centered around the clicked position. After the click, the sequence view will thus have a shorter
time span and the time at the center of the view will be equal to the time where the user clicked. Zooming out works in the same way: the SequenceView is zoomed
out centered on the clicked time. So first of all, we again convert the clicked position in pixels to a time. We then zoom in on the SequenceView (which zooms
centered around the center of the sequence view). Finally we need to scroll the view to the proper position so that the center of the view is equal to the
converted time. How is this scroll computation performed? Well since we know the width of the SequenceView in seconds (computed as w = right - left)
and say we wish to center around c then the new left and right boundaries of the SequenceView become:
left = c - 0.5 * w
right = c + 0.5 * w
Again there is the caveat that we may never allow scrolling below 0, so we must check that left > 0 and otherwise adjust the view. We give the code for
mouseClicked for the ZoomTool so you get an impression of how we implement the actions of Tools:
public void mouseClick(int x, int y) {
    double secondsleft  = SequenceView.secondsleft;
    double secondsright = SequenceView.secondsright;

    x = x - SequenceView.SV_X;

    double clicktime = (double)secondsleft + ((double)x / (double)SequenceView.SV_W) *
    	(double)(secondsright - secondsleft);

    //Do all the zoom factor and window width calculations here
    switch(state) {
        case ZOOM_IN:
            seqview.zoomin();
            break;
        case ZOOM_OUT:
            seqview.zoomout();
            break;
    }

    secondsleft  = SequenceView.secondsleft;
    secondsright = SequenceView.secondsright;

    //Reposition seqview around clicked position
    double windowwidth = secondsright - secondsleft;

    SequenceView.secondsleft  = clicktime - 0.5 * windowwidth;
    SequenceView.secondsright = clicktime + 0.5 * windowwidth;

    //Never allow us to see below 0.0 in time
    if(SequenceView.secondsleft < 0.0) {
        double delta = 0.0 - SequenceView.secondsleft;
        SequenceView.secondsleft  += delta;
        SequenceView.secondsright += delta;
    }
}
A variable state distinguishes between whether we are in the zoom-in or zoom-out state. Recall that this state is changed by the user
either holding the SHIFT key or not.
The PlaybackThread class is responsible for handling the playback of audio, when the user presses the play button. Audio playback takes place in a separate thread
to avoid locking up the application while playing audio. In fact, there would really be no way to stop playback again, if it were to take place in the same
thread as the rest of the program.
Playback always starts at the current cursor position. Playback is now done by looping through each WaveClip, considering each clip in turn. Recall that
WaveClips are ordered by starttime, so the first WaveClip that must be played will always be the first one in the vector. If the cursorposition lies between
the startime and endtime of the clip, then we need to start playback of the clip from the middle. The method playFromPosition handles this task
for us - it takes a startposition as argument, relative to the beginning of the clip. This relative time is simply:
cursor - starttime
If the startime of the WaveClip and the cursor coincide, then playback of that clip should start immediately, and from the beginning of the clip. Finally, if
the starttime of the WaveClip is greater than the cursorposition we need to wait before playing the WaveClip. The amount of time we need to wait is equal to the
time difference between the current cursorposition and the starttime of the WaveClip. This waiting is done by putting the thread to sleep for the correct number
of milliseconds. After this time has elapsed we move the cursor to the beginning of the WaveClip and start playback of it.
There is more to playback than what we have outlined above. This is because we also want the cursor to move on screen as play progresses. To do this we need to
continuously update the GUI. Again, in order to prevent blocking the entire application we spawn yet another thread to handle this updating. For this thread
to be able to update the cursor correctly it will need to communicate with the PlaybackThread to know how playback is progressing. PlaybackThread maintains a
variable, activeclip, that holds the clip currently being played back. The CursorUpdateThread class may use this variable to query the currently
playing WaveClip for the position being played back. In this way the cursor can be accurately updated while a clip is playing. Of course the notion of "currently
playing clip" is ambiguous, since more than one clip can be playing at the same time. It matters a lot which currently playing clip we choose as the active one.
We need to select the clip that finishes last. To understand why consider the case where two clips are playing simultaneously. Let us say that one plays in the
time interval [5, 10] (call it c1) seconds and the other in [7, 9] (call it c2). If we chose to let c2 be the active one when it starts,
then after the clip finishes at time 9 we would not know what to do. We no longer know that c1 is playing since we do not keep track of playing clips.
However, if we instead let c1 be the active one we don't run into problems. In general every time we encounter a new clip and start playback, we set it
as the active clip if it finishes later than the currently active clip.
When the playback starts PlaybackThread creates a CursorUpdateThread as well. The CursorUpdateThread will then use the activeclip variable to
determine the position of the cursor. In cases where no clip is playing the CursorUpdateThread of course will need to employ a different scheme for moving the
cursor - more about this in the description of the CursorUpdateThread class.
Once all WaveClips have been processed we cannot consider ourselves finished. Once the last WaveClip has been started, many clips could still be playing. We want
playback to stop (and to stop the CursorUpdateThread) once playback has finished completely - but not prematurely. So we need to wait for all clips to finish,
before the the run method of the PlaybackThread returns. Fortunately from the discussion above we know that it is sufficient to wait for
activeclip to finish. We wait in a loop that every 50 ms asks activeclip whether it is finished or not. If it is not we perform another
iteration in the loop - otherwise we break out, interrupt the CursorUpdateThread and return. This concludes the description of the PlaybackThread class. The code
is listed below.
public void run() {
    try {
        running = true;
        cursorupdatethread.start();

        double cursor          = SequenceView.cursor;
        double lastfinishtime  = 0.0;
        Vector clips = wavemanager.getClips();

        for(int i = 0; i < clips.size(); i++) {
            WaveClip clip = clips.get(i);

            if(clip.starttime < cursor && clip.endtime > cursor) {
                clip.playFromPosition(cursor - clip.starttime);
            }
            else if(clip.starttime == cursor) {
                clip.play();
            }
            else if(clip.starttime > cursor) {
                try {
                    Thread.sleep((int)((clip.starttime - cursor)*1000));
                    cursor = clip.starttime;
                }
                catch(Exception e) {
                    throw new InterruptedException();
                }
                clip.play();
            }

            //A clip can only be the actively playing one, if its track is not muted.
            if(!SequenceView.muted[clip.getTrack()-1]) {
                //We always use the clip that finishes last as our active clip. Thus if a short clip
                //is played while a long one is playing, the short one will never become the active one
                if(clip.endtime > lastfinishtime) {
                    lastfinishtime = clip.endtime;
                    activeclip = clip;
                }
            }
        }

        //Wait for completion
        boolean notrunning = false;
        while(!notrunning) {
            notrunning = true;
            if(activeclip != null && activeclip.isRunning())
                notrunning = false;
            Thread.sleep(50);
        }
        cursorupdatethread.interrupt();
        running = false;
    }
    catch(Exception e) {
        cursorupdatethread.interrupt();
        cursorupdatethread = null;
        running = false;
    }
}
The CursorUpdateThread is strongly coupled with the PlaybackThread. Its task is to keep the red cursor line up to date during playback of audio. This is done
by quering the activeclip variable of the PlaybackThread. A WaveClip has a method for returning the current position of playback of the clip.
The cursor can now be updated to s+c, where s is the starttime of the clip and c is the position of playback (which is relative to
the start of the clip). If no clip is active we resort to a different, more crude approximation to the current cursor position. In such a case we simply move
the cursor in 50 ms increments, and then sleep for 50 ms. This is not terribly accurate since there is no guarantee that the thread scheduler will activate the
CursorUpdateThread exactly after 50 ms - which means that slight "jolts" can be observed when going from a section with no WaveClips at all to a section
where one or more WaveClips begin. However, the thread scheduling is also in fact an issue for the PlaybackThread itself, since we use sleep to wait for the next
WaveClip to start. We have, however, not found a more accurate way of doing these timings. Besides, the issue is not terribly huge, since when rendering the
result to a wave-file (which is the final step when audio production is complete) we do not have these issues. Thus, the final result will always be accurate.
The inaccuracies seem to increase for slower machines - therefore it is important that the computer meets the system requirements we have specified.
The CursorUpdateThread also implements automatic scrolling of the SequenceView, when the cursor moves out the right side of the SequenceView. When this happens
the scrollright method is invoked on the SequenceView, to keep the cursor in the window.
The AmplifyGraphPanel represents the most complex part of the amplification dialog. The figure below illustrates what is regarded as the AmplifyGraphPanel. This
area is shown bright, while the rest of the dialog is darkened. As can be seen, the AmplifyGraphPanel is the part of the dialog, that does not contain standard
Java GUI components, but rather "hand-painted" buttons, graphs etc.

As can be seen from the figure, the waveform of the affected area is shown in the lower part of the dialog. In order to draw this, we first need to determine
the area of influence of the amplification. This is done, by looking at the current selection. In the case of a selecting made with the left and right marker
this is a trivial manner. In case selection was performed on a per-clip basis, we need to determine the start time of the first, and the end time of the last
of these selected clips. This computation is performed in the constructor of AmplifyGraphPanel, by communicating with the WaveManager in order to get information
on the start and end times of individual clips. In the rest of this section starttime will denote the start of the affected area and endtime will denote
the end of the affected area.
AmplifyGraphPanel implements the MouseListener interface in order to intercept mouse-clicks and drags. The AmplifyGraphPanel is quite interactive, and allows for
tool-selection as well as moving, selecting and inserting graph points. Thus mouse events are crucial.
The architecture within AmplifyGraphPanel is sort of a mini-version of the entire program. There is the notion of an active tool and an updatable area (the graph)
which can be seen as analogous to the SequenceView. When a mouse click occurs it is first tested whether the user clicked on one of the tools, in which case
the active tool is updated. Otherwise we check if the click was inside the graph area. The action to perform now depends on the currently active tool. If the
active tool is the select tool the method selectPoint is called with the mouse coordinates as argument. If the active tool is the insert point tool
then the method addPoint is called with the mouse coordinates as argument. Finally, nothing happens now if the active tool is the move tool, since
only mouse drags are interesting in this situation. In the following we will introduce the representation of the graph and discuss selectPoint as
well as addPoint.
The graph itself is implemented as a vector of two-dimensional points. The points will initially be screen-coordinates, so that they describe the on-screen position of the points. Later, these coordinates will need to be transformed to a different coordinate-system in which the x-values become time values and the y-values become amplification factors. But we are going to worry about this later. Initially only two points exist in this vector; a start point and an end point. This graph corresponds to a straight line through 100%, so that not modifying the graph will not modify the wave data either (100% will be converted to an amplification factor of 1). Thus, this is a sensible initial graph to have. The left and right endpoints can be moved in the vertical direction, but not in the horizontal one, since this would alter the affected area, and would not make sense. The vector of points is kept sorted by x-value, so that it will be easier to draw and to apply later, once the coordinates have been transformed to (time, amplifyfactor) pairs.
We now describe selectPoint. This action is performed when the user clicks in the graph area with the select tool as the active tool.
This method takes as input an xy-mouse coordinate of the click, and will determine which (if any) graph point was hit.
What we do, is we loop through each graph-point and consider each one in turn. The distance from the mouse click to the graph point is then computed. We allow each
graph point to have a certain area of influence, since otherwise they would only have an extent of a single pixel, and be near-impossible to hit with the mouse.
Therefore we consider a graph point hit, if it is within 5 pixels of the mouse click. We simply use the two-dimensional distance function to compute the distance
between the two points. We keep track of the closest point seen so far. Finally, if the distance to this point is less than 5, then we set the closest point as being
the selected one. The code is shown below for concreteness.
private void selectPoint(int x, int y) {
	selectedpoint = null;
	Point closest = null;
	double shortestdistance = 99999;
	for(int i = 0; i < graphpoints.size(); i++) {
		Point p  = graphpoints.get(i);
		int dx   = p.x - x;
		int dy   = p.y - y;
		double d = Math.sqrt(dx*dx + dy*dy);
		if(d < shortestdistance) {
			shortestdistance = d;
			closest          = p;
		}
	}

	if(shortestdistance < 5.0)
	{
		selectedpoint = closest;
		btGroup.setSelected(bt.getModel(), true);
	}
}
We move on to describing addPoint. This action is performed when the user clicks in the graph area with the insert point tool as the active tool.
This method also takes an xy-mouse coordinate as input. The implementation is very simple. We simply search through the vector of points to find the correct
insertion position based on the x-coordinate of the mouse click. Then a point is added using the unaltered mouse coordinates (since they are in screen space
just like the rest of the graph points). That is all there is to it. The code is shown below:
private void addPoint(int x, int y) {
	//The vector is kept sorted by x-coordinate. Find out where this point should be inserted
	//to preserve the ordering.
	int insertionposition = 0;
	for(int i = 0; i < graphpoints.size(); i++) {
		Point p = graphpoints.get(i);
		if(x > p.x)
			insertionposition++;
		else
			break;
	}

	graphpoints.add(insertionposition, new Point(x, y));
}
Mouse drag events are also captured by AmplifyGraphPanel. These events only have an effect when the move tool is selected. In this case, the selected graph points
should be moved in correspondance with the drag direction. Thus, we compute a delta (change in mouse coordinates since last time the method was invoked) and use
this to move the selected graph point. There is a one to one correspondance between the xy-delta and the amount we should move the graph point on screen, so it
is very simple to achieve. A few things must be taken into consideration however. First of all, as was mentioned before, we do not allow the start and endpoints
to be moved in the horizontal direction. Thus if the selected point is the first or the last in our vector of points, then we disregard any x-delta value. Second
of all, we do not allow graph points to move outside the graph area of the AmplifyGraphPanel. Therefore we always force the points into this area, if the user is
trying to drag them outside of it. But that is all there is to it.
Drawing the AmplifyGraphPanel is nontrivial business. First of all, we need to draw some labels for the axes of the graph, we need to draw a number of lines and
rectangles as well as bitmaps for the tools. But we also need to draw the wave data ranging from starttime to endtime. This is done by calling
the paint method of the WaveManager with the context set to the AmplifyGraphPanel. As was discussed under the description of the WaveClip class, a WaveClip is
able to draw itself in different contexts - the AmplifyGraphPanel being one of them. Thus most of the work is performed by each WaveClip. Drawing the graph is
not trivial either. How to draw it depends on the spline interpolation scheme selected by the user. An instance of SplineInterpolation is created with the graph
points as argument.
We use this object to compute intermediate values between the graph points (perform interpolation). For each x-coordinate we compute the corresponding y-coordinate
using the getY method of the SplineInterpolation object.
Once the user is finished modifying the graph, the graph will need to be converted so that the points receive more meaningful coordinates. We want x-values to correspond to time values in seconds, and we want y-values to correspond to amplification factors as indicated by the labels on the y-axis of the graph area. Thus, amplification factors will go from 0 to 3 (corresponding to the labels going from 0% to 300% in the dialog). Time will go from starttime to endtime. It is time to present the conversion formulae. Let W denote the width (in pixels) of the graph area on screen. Furthermore let X be the x-coordinate of the left side of the graph area (in pixels). Finally let H be the height (in pixels) of the graph area. The width of a single pixel in seconds is then:
pixelwidth = (endtime - starttime) / W
Using this, we may now convert a point (x, y) by the formulas:
time = starttime + (x - X) * pixelwidth
amplifyfactor = (3.0 * (H - y)) / H
The converted points are used to construct a SplineInterpolation object of the appropriate type (depending on the user selection). Then the AmplifyRegion method
is called on the WaveManager.
This is almost identical to the AmplifyGraphPanel and will not be further discussed here.
This is an abstract class representing the notion of a spline interpolation scheme. It has a method getY that, given some x-coordinate returns the
corresponding y-coordinate.
A spline function is traditionally used to interpolate a function given n points
(x,f(x)) of the
function. The spline fills out the gap between these n points, by connecting them by some
curve. A spline function of degree k is a piecewise k’th degree polynomial, which
connects each point to the next point by a polynomial of degree k.
In WaveEdit the splines are used in the graph panels of the AmplifySelection, FourierFilter and
DynamicFourierFilter dialogs, to connect the points the user inserts into the graph in some reasonable
fashion, rather than for interpolating functions.
When the user press the OK button and the effect is to be applied, the spline object is passed
on to the effect method, so that the method can then access the curve of graph by calling
the getY method of the spline object.
We have implemented linear and cubic splines, which connect the points by linear or cubic polynomials.
The linear spline is quite simple, as it just connects the points by straight lines.
The constructor of the LinearSplineInterpolation class takes a set of n points
as parameter.
The points are inserted into a balanced binary search tree, sorted by the x-coordinate of the
points. In case two points have the same x-coordinate, one of the points are discarded.
When the getY method is given an x-value x, it searches down the tree for the
greatest point with
x-value less than or equal to x. It connects this point to the next point, by calculating
the a and b variables of the equation y=ax+b for the straight
line between them, and returns the value ax+b.
The CubicSplineInterpolation class works the same way, except that instead of
using a straight line to connect a point to the next, it is using a cubic polynomial.
The only differences are that apart from storing the point at a tree node, it also stores two
coefficients hi and zi, and that the formula for getting the y-value given an x-value is different.
The formula we have used for the cubic polynomial Si connecting two points (xi,yi) and
(xi+1,yi+1) is:
Si(x) = zi/(6hi) (xi+1-x)3 + zi+1/(6hi) (x - xi)3 + (yi+1/hi - zi+1hi/6)) (x - xi) + (yi/hi - zihi/6) (xi+1-x)
where hi = xi+1 - xi and z0 = zn = 0. The rest of the coefficients z1,....,zn-1 are found by solving a system of linear equations involving the hi and yi coefficients using Gaussian elimination.
Represents a complex number in WaveEdit. A complex number is represented by two doubles - one representing the real, and one representing the imaginary part. Furthermore the class has a number of mathematical operations implemented, for performing various operations on complex numbers (adding them, multiplying them, exponentiating them etc.). For example:
public Complex exp () {
    return new Complex(Math.exp(a)*Math.cos(b), Math.exp(a)*Math.sin(b));
}
The abstract class SimpleFilter defines common elements to all simple filters, with the exception of the Chebychev filter. The class defines a lot of variables, but the interesting variables are the doubles a0, a1, a2, b1 and b2.
These coefficients are used by the biquad transfer function H. This function is defined as:
| H(z) = |
b0 + b1·z-1 + b2·z-2
|
Such a biquad function exists for each of the filters described below, and it describes which input/output values are needed, and by which coefficient it must be multiplied. The operator z-1 is called the delay operator. When applied to a sequence of values, the operator returns the previous value in the sequence. In other words z-1xn = xn-1.
The most straightforward way of implementing these simple filters is using the "Direct Form". Calculating the output samples using this Direct form is given by the equation below:
y[n] = (b0/a0)*x[n] + (b1/a0)*x[n-1] + (b2/a0)*x[n-2] - (a1/a0)*y[n-1] - (a2/a0)*y[n-2]
where x[n] is the n'th input sample and y[n] is the n'th output sample.
In order to use the above equation, the coefficients ai's and bi's must be calculated. SimpleFilter defines an abstract method calcCoefficients, which will be implemented by all filters extending this class. Constructing a simple filter by calling the SimpleFilter constructor will setup coefficients which are common for all filters (unlike the ai's and bi's which are different for each filter). The simple filter constructor is listed below:
  private static double log2 = 0.30102999566398;

  SimpleFilter(double dbGain, double rate, double f1, double f2, int samplestart, int sampleend, FILTER type) {
		centerfreq = Math.sqrt(f1*f2);
		bandwidth = Math.log10(f2 / f1) / log2;
		A1    = (type == FILTER.PeakingEQ ||
			 type == FILTER.LowShelf  ||
			 type == FILTER.HighShelf   ) ? Math.pow(10, dbGain/40) : Math.pow(10, dbGain/20);
		omega = 2.0 * Math.PI * centerfreq/rate;
		sn    = Math.sin(omega);
		cs    = Math.cos(omega);
		alpha = sn * Math.sinh(log2 / 2.0 * bandwidth * omega / sn );
		beta  = Math.sqrt(A1 + A1);
		this.samplestart = samplestart;
		this.sampleend = sampleend;
    }
The other function defined in SimpleFilter is applyFilter, which takes a double array of input samples (x[n] from the above equation), and returns a double array of output samples (y[n] from above). applyFilter is the same method for all filters (except Chebychev) and is a straightforward implementation of the "Direct Form" method:
	public double[] applyFilter(double[] in)
	{
		out = new double[in.length];
		double b0a0, b1a0, b2a0, a1a0, a2a0;
		b0a0 = b0 / a0;
		b1a0 = b1 / a0;
		b2a0 = b2 / a0;
		a1a0 = a1 / a0;
		a2a0 = a2 / a0;

		out[samplestart] = b0a0*in[samplestart];
		out[samplestart+1] = b0a0*in[samplestart+1] + b1a0*in[samplestart] - a1a0*out[samplestart];

		//Copy samples up to samplestart - the filter should not be applied to these samples
		for(int n = 0; n < samplestart; n++) {
			out[n] = in[n];
		}

		//Apply filter in the range [samplestart;sampleend]
		for(int n = samplestart+2; n < sampleend; n++)
		{
			out[n] = b0a0*in[n] + b1a0*in[n-1] + b2a0*in[n-2] - a1a0*out[n-1] - a2a0*out[n-2];
		}

		//Copy samples after sampleend - the filter should not be applied to these samples
		for(int n = sampleend; n < in.length; n++) {
			out[n] = in[n];
		}
		return out;
	}
The only thing worth mentioning about the applyFilter method is that it does not necessary run through all samples. The for-loop iterating through the samples starts at samplestart because it is possible to apply the filter to only a subset of the samples. Likewise, the for-loops stop at sampleend. Applying the filter to a whole clip is a matter of passing 0 and the length of the clip respectively.
Applying a filter to a WaveClip is a matter of calculating the coefficients using each filter's calcCoefficients method and invoking applyFilter on the unpacked double array.
A high-pass filter is a filter that passes high frequencies, but reduces frequencies lower than a specified cutoff frequency.
The coefficients for achieving a highpass filter is based on the values cs and alpha computed by the SimpleFilter
constructor (like the lowpass and bandpass filter described below).
	protected void calcCoefficients()
	{
          b0 = (1.0 + cs) /2.0;
          b1 = -(1.0 + cs);
          b2 = (1.0 + cs) / 2.0;
          a0 = 1.0 + alpha;
          a1 = -2.0 * cs;
          a2 = 1.0 - alpha;
	}
A low-pass filter is a filter that passes low frequencies, but reduces frequencies higher than a specified cutoff frequency. The coefficients are very
similar to those of a highpass filter, and calcCoefficients for the lowpass filter is listed below.
	protected void calcCoefficients()
	{
          b0 = (1.0 - cs) /2.0;
          b1 = 1.0 - cs;
          b2 = (1.0 - cs) / 2.0;
          a0 = 1.0 + alpha;
          a1 = -2.0 * cs;
          a2 = 1.0 - alpha;
	}
A band-pass filter is a filter that passes frequencies within a certain range and rejects those outside that range. A bandpass filter can be created by combining a low-pass filter with a high-pass filter, but this is not done in our program.
	protected void calcCoefficients()
	{
	  b0 = alpha;
          b1 = 0.0;
          b2 = -alpha;
          a0 = 1.0 + alpha;
          a1 = -2.0 * cs;
          a2 = 1.0 - alpha;
	}
A high shelf filter is useful for increasing or reducing a broad range of high frequencies. High shelf (or low shelf - see below) comes in handy when the overall balance of high and low frequencies is off. An example: If you have a weak bass, you could use a Low Shelf filter to enhance it, and similarly you can enhance high frequencies in a clip. High Shelf and Low Shelf filters have two controls, namely frequency and gain. The gain control adjusts how much of the selected frequencies will be added or taken away. If you have a High Shelf filter with the frequency set at 500 Hz, and the level set at -6 dB, all sounds above 500 Hz will be reduced by approximately 6 dB, and other frequencies will remain unaffected. To achieve a High shelf filter, the coeffiecients are calculated as follows:
	protected void calcCoefficients()
	{
	    b0 = A1 * ((A1 + 1.0) + (A1 - 1.0) * cs + beta * sn);
	    b1 = -2.0 * A1 * ((A1 - 1.0) + (A1 + 1.0) * cs);
	    b2 = A1 * ((A1 + 1.0) + (A1 - 1.0) * cs - beta * sn);
	    a0 = (A1 + 1.0) - (A1 - 1.0) * cs + beta * sn;
	    a1 = 2.0 * ((A1 - 1.0) - (A1 + 1.0) * cs);
	    a2 = (A1 + 1.0) - (A1 - 1.0) * cs - beta * sn;
	}
Calculating the coefficients for a low shelf filter, only differs in the signs of the expressions for high shelf filters. Listed below is the calcCoefficients method for low shelf filters.
	protected void calcCoefficients()
	{
	    b0 = A1 * ((A1 + 1.0) - (A1 - 1.0) * cs + beta * sn);
	    b1 = 2.0 * A1 * ((A1 - 1.0) - (A1 + 1.0) * cs);
	    b2 = A1 * ((A1 + 1.0) - (A1 - 1.0) * cs - beta * sn);
	    a0 = (A1 + 1.0) + (A1 - 1.0) * cs + beta * sn;
	    a1 = -2.0 * ((A1 - 1.0) + (A1 + 1.0) * cs);
	    a2 = (A1 + 1.0) + (A1 - 1.0) * cs - beta * sn;
	}
A peaking EQ filter will make a peak (or a dip) in the frequency response. The filter will boost the frequencies around the center frequency, calculated as the geometric mean value of the frequencies entered in the dialog box. Calculating the coefficients for a peaking EQ filter is a relatively simple matter.
	protected void calcCoefficients()
	{
          b0 = 1.0 + (alpha * A1);
          b1 = -2.0 * cs;
          b2 = 1.0 - (alpha * A1);
          a0 = 1.0 + (alpha /A1);
          a1 = -2.0 * cs;
          a2 = 1.0 - (alpha /A1);
	}
A Notch filter is used to cut out (or notch out) a narrow band of frequencies. An application of a notch filter is reduction of computer noise or hums. Notch filters are also used for getting rid of e.g. ringing drum tones. Again, listed below is the calcCoefficients method for the notch filter.
	protected void calcCoefficients()
	{
          b0 = 1.0;
          b1 = -2.0 * cs;
          b2 = 1.0;
          a0 = 1.0 + alpha;
          a1 = -2.0 * cs;
          a2 = 1.0 - alpha;
        }
To describe the Chebychev filter, we need some definitions. Roll-off is the term used to describe the steepness of the filter response in the transition region between passband (the frequency range over which the filter passes the signal energy) and stopband (the frequency band in which a filter attenuates) (see figure below).

The Chevbychev filter is designed to have a steeper roll-off and more passband ripple than a Butterworth filter.
The math behind calculating the coefficients for the Chebychev filter is rather complex, and will not be discussed in much detail here. The following method calculates the coefficients needed to apply a Chebychev filter. Inside the code are small comments refering to what is done.
	private double[] chebychevAux(int p)
	{
 	  //Variables for internal use
	  double RP, IP, ES, VX, KX, T, W, M, D, K, X0, X1, X2, Y1, Y2;

	  // Calculate the pole location on the unit circle
	  RP = (Math.cos(Math.PI / (poles*2.0) + (poles - 1.0)*Math.PI/(double)poles));
	  IP =  Math.sin(Math.PI / (poles*2.0) + (poles - 1.0)*Math.PI/(double)poles );

	  //Warp from a circle to an ellipse
	  if(ripple != 0)
	  {
	    ES = Math.sqrt( (100.0 /(100.0-(double)ripple)) * (100.0 /(100.0-(double)ripple)) - 1.0);
	    VX = (1.0/(double)poles)*Math.log( (1.0/ES)   + Math.sqrt( (1.0/(ES*ES))+1.0) ); //Notice: Math.log() is "ln"
	    KX = (1.0/(double)poles)*Math.log( (1.0/ES)   + Math.sqrt( (1.0/(ES*ES))-1.0) );
	    KX = ( Math.exp(KX) + Math.exp(-KX) ) / 2.0;
            RP = RP * (( Math.exp(VX) - Math.exp(-VX))/2.0)/KX;
	    IP = IP * (( Math.exp(VX) + Math.exp(-VX))/2.0)/KX;
  	  }

	  // s-domain to z-domain conversion
	  T  = 2.0 * Math.tan(0.5);
	  W  = 2.0*Math.PI * cutoff;
	  M  = RP * RP + IP * IP;
	  D  = 4.0 - 4.0*RP*T + M*T*T;
	  X0 = (T*T)/D;
	  X1 = 2.0*(T*T)/D;
	  X2 = (T*T)/D;
	  Y1 = (8.0 - 2.0*M*T*T)/D;
	  Y2 = (-4.0 - 4.0*RP*T - M*T*T)/D;

	  //LP to LP or LP to HP transform
	  double W2 = W / 2.0;

	  if(LH == 1) //High-pass filter
	     K = -Math.cos(W2 + 0.5) / Math.cos(W2 - 0.5);
	  else //Low-pass filter
	     K = Math.sin(0.5 - W2) / Math.sin(0.5 + W2);

  	  D  = 1.0 + Y1*K - Y2*K*K;
	  co[0] = ( X0 - X1*K + X2*K*K ) / D;
	  co[1] = ( -2.0*X0*K + X1 + X1*K*K - 2.0*X2*K ) / D;
	  co[2] = ( X0*K*K - X1*K + X2 ) / D;
	  co[3] = ( 2.0*K + Y1 + Y1*K*K - 2.0*Y2*K ) / D;
	  co[4] = ( -(K*K) - Y1*K + Y2 ) / D;

	  if(LH == 1) //high-pass filter
	  {
	    co[1] = -co[1];
	    co[3] = -co[3];
	  }

	  //the coefficients - co[0] = a0, c[1] = a1,...
	  return co;

	}
Applying the filter is not as straightforward as the other simple filters. Instead of calculating the coefficients once and for all, based on the users input, the coefficients in chebychevAux are calculated for each pole-pair. The coefficients returned by this function is used to construct a linear combination of a's and b's to form the final coefficients used in the "Direct form". Below is listed a snippet of the applyFilter method defined for Chebychev filters. Note that the co-array will contain the coefficients a0, a1, a2, b0, b1
	for(int p = 1; p <= (poles/2); p++)
	{
	  co = chebychevAux(p);

	  //Add coefficients to the cascade
	  for(int i = 0; i < Aarray.length; i++)
	  {
 	    TA[i] = Aarray[i]; TB[i] = Barray[i];
	  }

	  for(int i = 2; i < Aarray.length; i++)
	  {
	    Aarray[i] = co[0]*TA[i] + co[1]*TA[i-1] + co[2]*TA[i-2];
	    Barray[i] = TB[i] - co[3]*TB[i-1] - co[4]*TB[i-2];
	  }
         } //End for: each pole-pair
This class is capable of showing a load screen with no additional information (no progress bar etc.). The code will not be discussed here.
This class is used by the effects based on the Fourier transformation, while the effect is being applied. The progress bar is updated, each time a burst has been processed. The code will not be discussed here.

This class is responsible for displaying our nifty Splash Screen that is shown at startup.

The code will not be discussed here.
We have chosen not to directly describe the FourierTransform classes, windowing classes and TimeStretch classes. Instead we have dedicated this section
to this part of our program, containing a little more theory than previous sections.
Let us start by briefly summing up the basics of the Fourier transformation and its use.
The reason for using Fourier transformation is that it allows us to go from the time domain to
the frequency domain. In the frequency domain we can do modifications we either can’t do in the
time domain or that are easier to do in the frequency domain.
The inverse Fourier transformation goes the other way around - from the
frequency domain to the time domain, and allows us to resynthesize the sound, including any
modifications we might have done.
If we apply the Fourier transformation to a wave of N samples (an array of N samples), we
get a frame of N bins (an array of N bins). Only the first N/2 bins are useful. These N/2 bins
corresponds to the frequency range from 0Hz to samplerate/2 (the Nyquist frequency) in jumps
of samplerate/N - i.e. the frequency resolution of our spectrum is samplerate/N. This means
that we don’t get a smooth continuous frequency range, but a discrete range.
Optimally each bin would contain only a certain frequency, but since we have
a discrete range, they correspond to an interval of frequencies. The center frequency for bin I
in the frame is samplerate/N*I, and we say that the bin corresponds to this frequency.
(Notice that the center frequencies of the bins increases linearly, which is unfortunate in a
psycho acoustic sense, as our hearing is exponential.)
Each bin is represented as a complex number. The modulus of the complex number is the amplitude of the frequency that the bins correspond to (more precisely, the interval of frequencies). The argument of the complex number is the initial phase of the sine wave with this frequency, and is a value between -π and π.
The formula for the discrete Fourier transformation (DFT) is: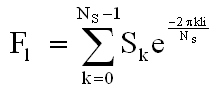
The array of the N bins we get is (FI | I=0,1,...,Ns-1).
The formula for the inverse Fourier transformation (iDFT) is: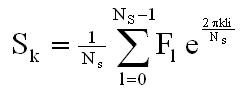
The array of the N samples we get is (Sk | k=0,1,...,Ns-1).
(To avoid too much notational clutter, we let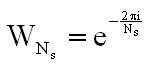
throughout this section)
As stated above, the Fourier transformation and its inverse work on complex numbers. Since our samples are real, their imaginary part is 0, and we can feed these complex numbers to the transformation. The inverse tranformation returns complex numbers as well, but we can ignore the imaginary part.
We will now describe how we implemented the Fourier transformation. We made several different implementations, as the first ones were too slow for our needs.
The first implementation we did of the Fourier transformation and the inverse transformation, was simply to implement the formulas from [PV page 24 and 48] directly. This boils down to two for-loops inside each other.
Java-like pseudo-code for our first implementation of the Fourier transformation:
    public complex[] DFT(double[] burst) {

        int Ns = burst.length;
        complex[] bins = new complex[Ns];

        for (int l=0; l<Ns; l++) {
            complex sum = 0+0i;
            for (int k=0; k<Ns; k++) {
                sum += burst[k] * e-2πkli/Ns
            }
            bins[l] = sum;
        }

        return bins;
    }
When reading this, assume that Java has a complex primitive datatype. The method takes the input wave (or just a burst, if we use windowing) as input as a double array, and outputs the bins of the frame as a complex array. It should be fairly easy to see that this code precisely corresponds to the formula.
    public double[] iDFT(complex[] frame) {

        int Ns = frame.length;
        double[] burst = new double[Ns];

        for (int k=0; k<Ns; k++) {
            double sum = 0;
            for (int l=0; l<Ns; l++) {
                sum += Re(frame[l] * e2πkli/Ns)
            }
            burst[k] = sum / Ns;
        }

        return burst;
    }
The code for the inverse transformation is almost identical, since the formulas are almost the same. The differences are that we have opposite signs in the exponent, and that we have to multiply by 1/Ns for each k. Also, the input array is of course now complex, and the output array is of type double. The output array contains the real parts of the complex numbers from the formula.
A slight optimization can be done here. According to [PV] we only have to store the first
Ns/2 bins, since the last Ns/2 bins are merely a mirrored complex conjugated
version of the first bins. That
can be seen from the fact that:

Bin Ns/2 represents the Nyquist frequency, so the last Ns/2 bins would not
have been useful anyway.
By this approach, we only use half the storage for our frame, since we only have
to store half the bins, and at the same time the non-inverse transformation will be a bit faster
since the outer for loop only has to go through I=0,1,2,...,Ns/2 (the inverse
transformation still has to run through all Ns).
This implementation is very simple, but unfortunately it’s also very slow. We have one for-loop
inside another, both going from 0 to Ns, so we have an O(Ns2)
algorithm.
This is extremely slow. Consider for example a one second wave at 44100Hz.
For this wave, it will loop 44100*44100=1,944,810,000 times - and that was just for a one second
wave! Of course, this can be improved by using windowing (will be described below), instead of doing
the Fourier transformation on the entire wave, but it’s still very slow.
This was too slow for our needs, so we wanted to implement the "Fast Fourier
Transformation" (FFT) instead. The FFT algorithm returns the exact same results as the above
algorithm, but does so in only O(nlogn) time. The algorithm is not explained in the material covered
in the class, so we went on to find descriptions on the net and tried building an algorithm from that.
The Fast Fourier Transformation algorithm we have used is the Cooley-Turkey algorithm (see description at http://en.wikipedia.org/wiki/Cooley-Tukey_FFT_algorithm).
Let us start by defining what we will mean by a "N-point DFT". An N-point DFT is the result of the discrete Fourier transformation applied to N input samples, resulting in N output bins (i.e. an array of N complex numbers). Similarly, an N-point inverse DFT is the result of the inverse discrete Fourier transformation applied to N input bins and resulting in N output samples.
The Cooley-Turkey algorithm builds on the familiar divide-and-conquer strategy. The idea is to split the problem into two, solve these two problems independently (by splitting each of them into two as well, until we have a problem of size 1 that is trivial to solve), and merging these solutions into the solution of the original big problem.
More precisely: in this case the idea is that if we have a wave of length Ns and want to get the Ns-point DFT, we split the wave into two smaller waves, both of length Ns/2. For each of these subwaves we calculate the Ns/2-point DFT (by applying the same trick recursively), which gives us the two frames for the two subwaves. Now we merge the two smaller frames (each with Ns/2 bins) into one big frame (with Ns bins) for the entire wave.
How do we do that?
To do that, we somehow have to express the Ns-point DFT from the two smaller Ns/2-point DFTs. Before we do that let us just state a small lemma which we will use:
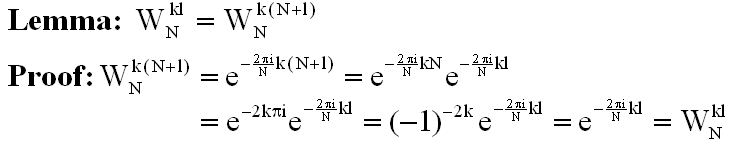
Now, let’s attempt to express the Ns-point DFT from the two smaller Ns/2-point DFTs.
Let’s say our input wave consists of the samples S=(S0,S1,S2,..., SNs-1) and that Ns is a power of 2. We now form the array consisting of the even samples S2m and the odd samples S2m+1 of S: E=(S0,S2,S4,...,SNs-2), O=(S1,S3,S5,...,SNs-1). This divides the problem into two smaller problems.
We will now show how the Ns-point DFT of S can be expressed from the Ns/2-point
DFTs of the smaller waves E and O - i.e. how to merge the solution of the two sub-problems into a
solution to the main problem.
Remember that DFT(S) = {FI | I=0,1,...,Ns-1}. For all
I=0,1,...,Ns-1, FI can be written as:
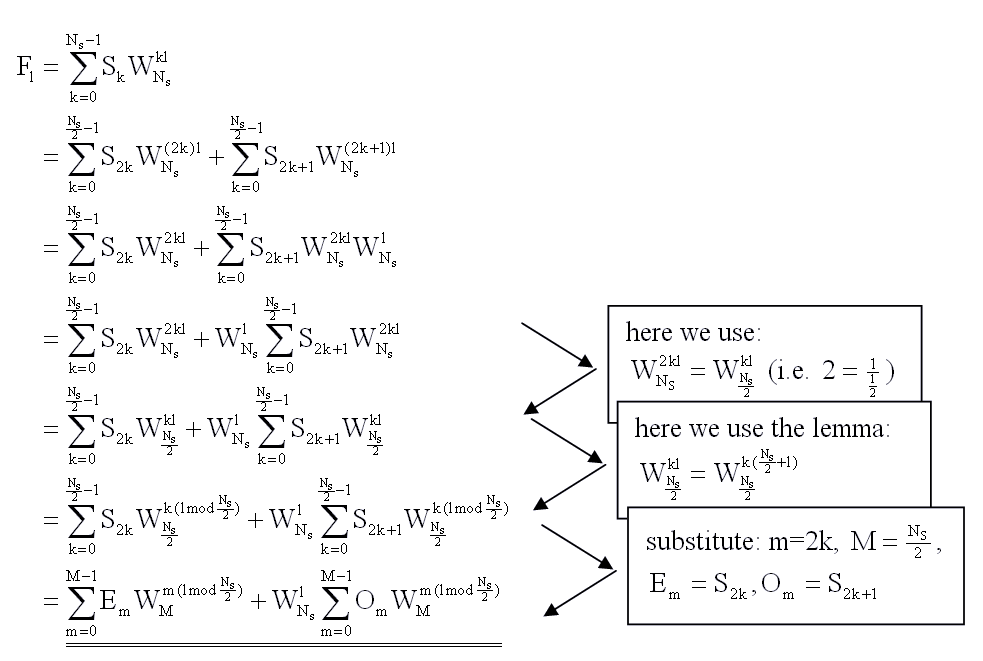
So if we calculate the Ns/2-point DFTs for the even and odd samples
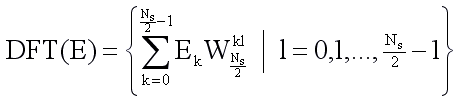
and
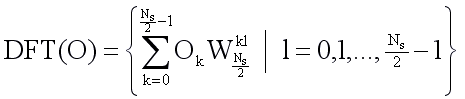
we can merge them together to the Ns-point DFT for the entire S wave
by using this equation.
The base case for our recursion is 1-point DFTs. An 1-point DFT takes in one input sample and
returns one bin as output. The output value is simply the input value itself, since
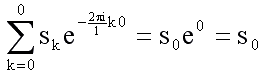
The algorithm now becomes:
    public complex[] FFT(double[] burst) {

        int Ns = burst.length;
        complex[] bins = new complex[Ns];

        if (Ns == 1) {
            bins[0] = burst[0]+0i;
        } else {
	    double[] E = new double[Ns/2];
	    double[] O = new double[Ns/2];
	    for (int k=0; k<Ns/2; k++) {
		E[k] = burst[2k+0];
		O[k] = burst[2k+1];
	    }

            complex[] E_DFT = FFT(E);
            complex[] O_DFT = FFT(O);

            for (int l=0; l<Ns; l++)
                bins[l] = E_DFT[l%(Ns/2)] + e-2πli/Ns * O_DFT[l%(Ns/2)];
        }

        return bins;
    }
The inverse transformation is of course almost the same, we just have to invert the sign in the exponent to e, multiply by 1/Ns and have a complex array as input and a double array as output (also for E and O).
Notice that Ns has to be a power of 2 for this method to work. If Ns is not a power of two, we can’t split the sample recursively into two smaller parts as we’ve done. This limitation is actually not really a problem, since we are using windowing (as will be explained below). If necessary we can zero-pad a burst to become a power of 2, and since windows are usually relatively small, it’s not too many bytes we are wasting by doing this.
This is much faster than the first implementation, but it’s still a bit slow due to the fact that recursion (i.e. method calling) takes time and creating two arrays in each recursion also takes quite some time (remember that Java initializes the elements of its arrays to 0 or null on creation, so creating an array of length n takes O(n) rather than O(1)). These slow downs don’t change the complexity, but they take extra time and memory. To speed it up, we can turn it into an iterative algorithm and avoid these slow downs.
We want to make an iterative algorithm that does the same as the recursive function. In this
algorithm we once again get the input burst array (of length Ns), but we only create
one output array (also of length Ns) which we use throughout the entire algorithm,
instead of making lots of intermediate arrays as we did in the recursive algorithm.
We have to convert the divide and the merge steps into an iterative process.
The algorithm works by first executing all the divide operations, and only afterwards executing
the merge operations (as opposed to how the recursive algorithm worked). We will first explain the
divide-step and then the merge-step.
The idea on how to do that comes from looking at the recursion tree for the recursive method:

At the lowest level the leafs are already 1-point DFTs as we’ve seen
above (so we can consider them already calculated frames). In the recursive algorithm, each leaf
would have to be merged with its sibling to produce the 2-point DFT for the parents at the level
above.
The first step of the iterative algorithm is to find out which elements of
the input array will be siblings at the lowest level of the recursion tree, without actually
performing the recursion. If we can do that, we have performed the entire divide step. This can
be achieved by "bit reversal sorting".
If we look at the elements at the top level of the figure, and write their indices in binary, we see that if we reverse the bits, we actually get the order of the elements at the lowest level:
This observation holds in general, and means that if we sort the elements in the original input array after the bit-reversed indices instead of their original indices, we have already performed the entire divide-step!
The sorting is simply done by running from left to right in the input array, and swapping the element
at index i with the element at bitReverse(i). It’s okay to swap them, as the element at index
bitreverse(i) must be placed at index i, since bitreverse(bitreverse(i))=i.
Of course we should be careful not to swap an element back to its original position, so it’s only
done if bitreverse(i)>i.
Our implementation of the sorting algorithm takes O(nlogn) time.
Now we have to merge from the bottom of the tree and up - again, without doing the actual recursion. We complete each level before we move up to the next - for example, we make all 2-point DFTs (by merging the 1-point DFTs) before we begin making any 4-point DFTs (by merging the 2-point DFTs).
Remember that we only have one array for all the DFTs and for all the levels (instead of one array for each DFT, as we had in the recursive algorithm).
At the lowest level there is nothing to do (these are already 1-point DFTs).
At the next level we have to merge the 1-point DFT siblings into 2-point DFTs. This is done according to the same equation as we used for merging in the recursive algorithm. Because of the way we sorted the array, the siblings we have to merge are neighbors in the array. The resulting 2-point DFT will occupy the same space in the array as its two 1-point DFT children did.
At the next level we merge the 2-point DFT siblings into 4-point DFTs. Again the 2-point DFTs we have to merge are just next to each other in the array, and the resulting 4-point DFT will occupy the same space as the DFTs it was made from.
We continue like this, until we are at the top level, and merge the two Ns/2-point DFTs into the final Ns-point DFT.
    public complex[] FFT(complex[] burst) {

        int Ns = burst.length;

        // perform the divide step
        complex[] bins = bitReversal(burst);

        // perform the merge step
        for (int dftsize = 2; dftsize ≤ Ns; dftsize *= 2) {

            for (int dft = 0; dft < Ns/dftsize; dft++) {

                for (int k = 0; k < dftsize/2; k++) {

		    int l = dft*dftsize+k;

		    complex ek = bins[l];
		    complex ok = bins[l+dftsize/2];

		    bins[l]           = ek + e-2πli/dftsize * ok
		    bins[l+dftsize/2] = ek - e-2πli/dftsize * ok
		}
	    }
	}

	return bins;
    }
To avoid making almost identical functions for the transformation and the inverse transformation, both the input-array and output-array is complex. The label names correspond to the non-inverse transformation.
The dftsize variable is the size of the DFTs at this depth of the tree we’re currently at.
Notice that we start at the level where DFTs has size 2 - i.e. the next to lowest level.
The dft variable is the number (counted from left to right) of the
DFT we are currently creating at this level. The leftmost DFT is number 0, the next is number 1,
etc.
The k variable is an index in the DFT we are currently creating.
The ek and ok values are the k’th
element of the even and odd DFTs we are merging to produce this DFT. (i.e. the k’th elements in
the two children)
The l variable is an index that corresponds to the index k,
but is measured from the beginning of the array instead of from the beginning of the current DFT.
The k variable runs from 0 to dftsize/2-1 - i.e. it runs through the first half
of the elements of the DFT we are currently creating. We know that the last half of the DFT is the complex
conjugate of this DFT so we don’t need to run through the rest. Also, the odd and even sub-DFTs
we are merging, has exactly this length, so k will run through them entirely.
Note that after we have read from the l’th and (l+dftsize/2)’th elements in the array, we
immediately overwrite them by the result, so if we had let k run to dftsize-1
rather than dftsize/2-1 (and used the modulo operator when reading ek
and ok) we would read invalid data, when reading ek
and ok, for k≥dftsize/2.
This is what we have used in WaveEdit.
Notice that both the divide-step (the bit reversal) and the merge-step can easily be done in-place. If the bit reversal writes its output directly to the input array (can be done since it only involves swapping its elements around), and the merge step also writes directly to the input array, it will only use O(1) space.
A few minor optimizations has been done in our code compared to the pseudo code, to avoid creating lots of objects all the time. Further speed improvements could be achieved by for example not using the Complex objects at all, and just use two double values for representing a complex number, but this comes very much at the expense of readability.
If we split the wave into smaller pieces and do our analysis, modification and synthesis independently on these pieces, we get some time resolution. By varying our modification on these pieces, the modification will vary over time. These pieces are called "time slices" and this approach is called windowing, since we can imagine we only look at part of the sound through a window.
One thing to note here, is that time resolution comes at the cost of frequency resolution, and frequency resolution comes at the expense of time resolution. The shorter we make our time slices, the better time resolution we get, but the worse frequency resolution we get. This is because there will be less bins in our frame as a result of doing the Fourier transformation on a smaller time slice. On the other hand, if we increase the length of our time slices, we get more bins in our frame, but of course less time resolution. So time resolution has to be balanced with frequency resolution.
The Fourier transformation is intended for periodic signals, but we’re most likely using it on
non-periodic signals (our time slices or the entire wave). The transformation assumes that the
wave it’s applied to is periodic and that the period is equal to the wavelength
(or that the wavelength is a multiple of the period length).
If our sound is periodic and satisfies this condition, we will get the frequencies
distributed perfectly into our bins. Of course only up to the resolution of the frame,
but we will not get artificial frequencies into
some of the bins, that weren’t present in the input signal. For example if we have a sine wave that
has a period length that fits with the window size, we will get a perfect spike in the amplitude
spectrum.
If our sound is either non-periodic or if the wavelength isn’t a multiple of the period length, we will have a discontinuity between the first sample and the last sample of the time slice. This will result in some extra frequencies in our frame, corresponding to the frequencies needed to generate this discontinuity, which were actually not part of the sound. So in the case of a sine wave, we will not get a perfect spike.
To fix this, we can apply a window function (e.g. a Hann-window) on each time slice, which smoothly turns down the volume at the beginning and at the end of the time slice. The first and last samples are 0 and the discontinuity between them has been eliminated. A window function gives values in the interval [0;1], and is simply applied by multiplying the time slice by the window. A time slice with a window applied to it, is called a burst.
Turning down the volume at the beginning and at the end of each burst, is clearly audible, and
gives an unwanted tremolo effect, as the volume is turned up and down all the time.
To avoid this amplitude modulation, we can let the windows overlap each other instead
of being placed after each other. So instead of positioning each window after the previous, we
could for example position each window 1/4th past the previous window. If we chose a sufficiently
large overlap (for example 4) the modulation will be eliminated, since the sum of the windows
will be approximately constant.
Note that the resulting time slice from the inverse Fourier transformation should
also be multiplied by the window, to be sure it is also smooth and starts/ends in 0, which is
important when making the resulting sound of the result bursts.
When adding the overlapping bursts together, we will get a certain gain as a result (i.e. the amplitude of the resulting sound will be too high, since the bursts are added together). Miller Puckette mentions in [MP, p.277] that a Hann-window with an overlap of 4 will result in a gain of 3/2. So in that case the resulting wave must be multiplied by 2/3 to remove that gain. He doesn’t mention any general formula, so in WaveEdit, we detect this gain experimentally by adding the overlapping windows together (we do not multiply them by a time slice here), and finding the maximum value. We have seen that the gain very much depends on the windowing function and the window overlap (as one could expect). The method of using 3/2 or the experimentally detected gain, did however not always avoid the clipping. Sometimes the sum of amplitudes were above these values. To solve this problem once and for all, we ended up avoiding the clipping by normalizing the output wave.
Since this windowing approach lets us enter the time domain, it’s sometimes called "Short Time Fourier Analysis" (STFT).
We have implemented the Hann (also known as Hanning) and Blackman windowing functions in WaveEdit,
as well as the "rectangular" windowing function. The rectangular windowing function is constant 1,
and thus corresponds to having no windowing function. The formulas for the Hann and Blackman
windowing functions can be seen at
http://en.wikipedia.org/wiki/Window_function.
We have not been able to hear the difference between the Blackman and the Hann
window yet, but it’s easy to hear the extra frequencies due to the discontinuities when using the
rectangular window, even though the noise usually isn’t overwhelming.
(the implementations are in the files Window.java, BlackmanWindow.java,
HanningWindow.java, RectangularWindow.java)
In the effects that use the Fourier transformation in WaveEdit, you can select window function, window size and window overlap, to experiment with the differences. In order to avoid amplitude modulation, the window overlap should be set to at least 4, and you have to balance the window size between whether you want good time or frequency resolution. Remember that big window sizes and big window overlaps also have an impact on the speed.
In this section we will describe the effects we have implemented using fourier transformation.
The first effect we have implemented using Fourier Transformation, is a filter that doesn’t vary over time (i.e. windowing is not strictly necessary). It has already been described above how to use the filter from WaveEdit, so in this section we will concentrate on the implementation.
The filter is implemented by, for each bin in the frame of each burst, multiplying the bin by the y-value of the graph corresponding to the center frequency (Fs/Ns*I) of the bin. The exact same modification is done on each frame and the modification thus does not change over time.
Let us briefly return to the lower part of the window in the user-interface, where the windowing options can be set. You can select the window size, the windowing function (including the rectangular window, so that you can hear how it would sound if no windowing functions were applied), and the window overlap (setting it below 4 will give you the "tremolo effect" mentioned above).
To test our filter, we have made a PD-patch which applies a lowpass filter to a wave file. The lowpass filter in PD and the lowpass filter in our implementation, sounds the same at the same cutoff frequencies, so it would seem to work correctly. The patch can be found at here.
The second effect we have implemented using the Fourier Transformation, is a filter that varies over time. Since it would be quite hard to make a reasonable GUI that gives you as much freedom as in the constant filter and at the same time also includes the time domain, we have limited it to a simple lowpass and highpass filter.
As opposed to the constant filter, the dynamic filter modifies each burst differently, so that the modification changes over time. If a burst corresponds to the x-coordinate t in the graph, the y-coordinate corresponding to t will be used as cutoff frequency for the burst.
At first we simply did it so that if the lowpass filter was selected, all bins with center frequencies
above that cutoff frequency would be set to 0, and the other bins wouldn’t be changed. If the
highpass filter was selected, the bins with center frequencies below the cutoff frequency would be
set to 0, while the rest would remain unchanged.
This works well for noisy sounds with frequency components in the entire spectrum,
but not so well if the sound only has spikes which are far apart. For example in a sawtooth wave,
there is a considerable space between the spikes for each overtone, so a slide using the above method
would not sound
smooth. Instead of a smooth slide we would hear sudden jumps, as the cutoff frequency passed the
frequencies of the spikes. It would sound like the cutoff frequency raised in abrupt jumps.
In order to fix this, we made a softer cutoff, so that the frequencies above the
cutoff frequency are not simply completely cut off. Instead there is a certain frequency range,
centered at the cutoff frequency, where we slowly turn down
the amplitude from 100% to 0%. At the beginning of the range the amplitude is 100%. The
amplitude is decreased throughout the range, ending at 0%. A similar thing is done for highpass.
The final effect we have implemented using Fourier transformation is time stretch. Time stretch is to stretch or compress a sound while still preserving its pitch.
This is basically done by either increasing or decreasing the distance between the bursts in the output compared to their position in the input. Increasing the distance leads to stretching the sound, while decreasing it leads to compressing the sound (see for example figure 11 in [PV]).
However when changing the distance between the bursts like this, we might introduce discontinuities or interference. For example, consider a sinusoidal corresponding to a frequency present in the sound and consider two consecutive bursts. Before the distance between the bursts are changed, the initial phase of the sinusoidal in the second burst is such that it fits with the phase of the sinusoidal in the first burst. When changing the distance between the bursts, they may come out of phase, since the sinusoidal of the second burst will start at the wrong point of it’s period. The initial phase of the second burst must be corrected to reflect the new time difference between the bursts.
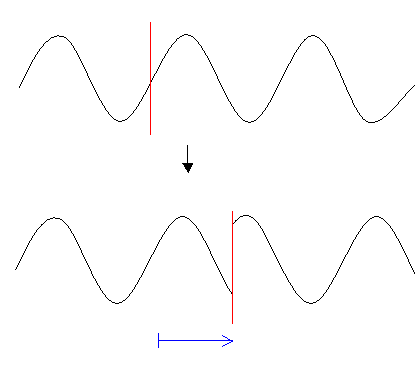
This is done as described in [PV], by first finding the phase change frequencies fl(j), and then use either the harmonic or non-harmonic approach to correct the phases (see [PV, p. 53-58]).
The way we find the peak frequencies is very simple. We say there is a peak at a bin, if its four
neighbors have lower amplitude than itself: Fl-2 < Fl-1 < Fl
> Fl+1 > Fl+2. The valley between two peaks are simply selected as the
bin with lowest amplitude between the peaks. These peaks and valleys are now used to form the
intervals Γk. Next, we calculate the corrected phase of the peak bin in each interval.
The rest of the bins in each interval are interpolated from the peak phase of the interval using
either the harmonic or non-harmonic methods.
According to [PV], finding peaks is a matter of experience. Since we have no experience with this, we just started out doing it as simple as possible. Although this is an extremely simple way to do it, it does work fairly well. It does fix the phases, so that the stretched sound no longer sounds robotic.
As described above, you can select stretch percent in the interface (less than 100% will compress the sound, greater than 100% will stretch it), and select the harmonic and non-harmonic phase correction methods. As a last option you can select "robotic", which means no phase correction. With this option it’s possible to hear how it would sound, if no phase correction was applied.
Finally, in order to avoid amplitude modulation in the output sound, the window overlap of the input sound should be chosen, such that the window overlap of the output sound will be 4. The window overlap setting in the GUI is the window overlap of the input sound, so if the sound is stretched to for example 200% the window overlap should be set to 8. Since it can be quite cumbersome to do this manually, a checkbox can be checked, to let the program automatically set the input window overlap so that it is 4 in the output sound.
Unfortunately, the harmonic method does not sound good in our implementation. It would seem that
we’re violating one of the two conditions on page 53 of [PV] when using the harmonic
method, but we have not been able to find any mistakes. We have experimented with more sophisticated
schemes of detecting peaks and valleys, like for example using only the maxP highest peaks, and
ignoring peaks below a certain tolerance, but none of this solved the problem.
In fact it sounded a bit worse. It’s possible that there
are some round off errors in the code, but we haven’t yet been able to locate them.
We have used the I07.phase.vocoder.pd patch, to compare our non-harmonic time stretch with the
time stretch in the patch. They sound pretty similar, but not identical. We hadn’t
expected that they would sound completely identical anyway, as they probably don’t do it the exact
same way as we do. However, the patch sounds slightly better, which may indicate that our implementation
needs some more work.
We feel that we have managed to create a nice and polished application, that has functionality that could be useful for end users (not just computer scientists). Playing around with WaveEdit allows the user to familiarize himself with filters, and try out different settings.
All in all our experience with Java as a platform for creating audio applications has been reasonably good. We had
a few issues - for instance the problems with determining whether a clip was playing or not. But the problem was
solvable. We haven't actually used a lot of the functionality in Java. We mostly use only the Clip class as well as the
classes required to initialize audio in Java. We have not worked
with datalines as it seemed more intuitive (and fitted better into our object oriented architecture) to use clips.
But we have showed that a lot is possible using only these object from the Java library. Manipulations of the audio is
done solely by our code and we only need Java for playback of audio.
WaveEdit has a nice WaveClip editing functionality. However, as a sequencer it is less powerful.
Current industrial strength wave sequencers work with pointers into wave files. Copying a section in the middle
of a wave clip and pasting it somewhere else in the project will not create a physical copy, but just a reference
into the relevant positions in the wave file. In this way the wave file is stored only once in memory.
Transformations and filters are then applied in real time leaving the original wave clip untouched. Only when
rendering is performed do we compute and store new audio data. This scheme significantly reduces memory requirements.
However, this is done at the expense of CPU power required. If many tracks play at the same time, with many
complicated filters being applied to them, then the program may have trouble dealing with it. In our case this
is not a problem at all. Undoing is much more difficult to implement in our case since the audio data is actually altered by filters.
All in all if we had more time we would change the implementation to be based on pointers into audio files and
let all filters be applied in real time. We would also implement an undo feature for our program.
It would also be nice to be able to control effects in real time. If we implemented the above we could have filters applied while the audio was playing, so that one could adjust the parameters in real time while listening to the result. This is probably not something we would do in the near future as it would require a lot of work. But we would just like to mention that it would be nice, as it can be difficult to come up with correct settings for a filter, without having real time control.
A severe restriction in WaveEdit is that it can only deal with mono sounds. Stereo is not supported. This would
not be difficult, but a little tedious to support. We need a way to display a stereo track in the SequenceView
(perhaps as two tracks on top of each other), and then we need to extend the various audio handling functionality
to be able to handle audio data formatted in stereo. We did not have the time required to perform this extension, but
of course it would be one of the first things to look into, if we had more time to work on WaveEdit.
We would also have liked to have the last quirks of our time stretch implementation eliminated, so that it would sound more like, for example, the implementation in PD. What we have implemented is time stretch by a constant factor, but it’s of course also possible to stretch by a variable factor (i.e. vary the analysis hop of the output sound over time). If we had more time, we would also have liked to look into this.
Finally, we would like to improve on the scheduling during playback. Our playback is not perfectly accurate (although reasonably accurate on fast (> 3 GHz) machines).
| [PV] | Phase Vocoder - et computervćrktřj for musikere og komponister, Peter Mřller Nielsen og Steffen Brandorff, Department of Information and Media Studies, University of Aarhus, December 2003 |
| [MP] | The Theory and Technique of Electronic Music, Miller Puckette, DRAFT: September 4, 2006 |
| Source code: | WaveEditSource.zip |
| Java class files (for running WaveEdit): | WaveEditClass.zip |
| Executable .jar file (for running WaveEdit): | WaveEdit.jar |
| Example wav file (for testing WaveEdit): | WaveditTurtles.wav |
| Pd patches: | waveformtest.pd fourierFilterTest.pd |